Staring down a WordPress migration and not sure where to get started? Don’t worry! Migrating WordPress is nowhere near as complicated as it once was. Even if you’re not super tech-savvy, I can almost guarantee you can figure out how to migrate WordPress without too much pain and suffering.
Best of all – the method I’ll outline in this post works whether you’re just moving your site to new hosting or migrating your WordPress site to an entirely new domain name. Either way – it’s the same process!
 Exclusive WPEngine Coupon Code for AlienWP Visitors!
Get 5 Months Free & 30% Off All Plans.
Click the coupon code to copy and open the link »
All you’ll need is:
- A free plugin called Duplicator
- Access to cPanel or another way to create a blank database
The plugin will handle everything else for you. And I’ll handle giving you detailed instructions for every single step.
Let’s get started! But first…
Do You Actually Need to Move WordPress By Yourself?
If you’re thinking that you’ll need to migrate WordPress just because you’re switching hosts…you might not actually need to lift a finger.
See, nowadays most quality WordPress hosts offer free site migrations. That means they’ll migrate your WordPress site over for free as a thank you for signing up for their hosting. If your chosen host doesn’t offer free migrations, you might want to give our hosting list a look over and pick a host that’s a bit more friendly.
All that to say – before you start running off to do this manually, make sure that you’re not missing out on a free WordPress migration service from your host!
Once you’ve ruled that out, here’s the detailed guide for how to migrate WordPress to either a new host or new domain name (or both at the same time!).
How to Migrate WordPress to New Hosting or Domain
While you can manually move WordPress by copying all of your site’s files and exporting your database via PHPMyAdmin…that’s a massive pain. And, in most cases it’s completely unnecessary.
See, as is often the case with WordPress, helpful developers have created a reliable (and free) plugin which handles the entire migration process in a much more user friendly manner.
Because the end result is the same, I’m going to eschew the 100% manual method in favor of showing you how to migrate WordPress using the free Duplicator plugin.
This plugin is popular, well-supported, and listed at WordPress.org. For the vast majority of sites, the free version of Duplicator is all that’s needed to migrate WordPress. Some WordPress sites that are especially large might need the premium version that offers better support for large migrations – but I’ve never personally experienced a site that couldn’t be migrated with the free version.
In a nutshell, here’s everything you’ll need to do to migrate your WordPress site with the Duplicator plugin:
- Create a backup “package” of your site
- Upload the package to your new host or server
- Run the Duplicator installer file
- (Optional) Update your site to a new domain name by having Duplicator change all references to your old URL to your new domain
Step 1: Install Duplicator on the Site You Want to Migrate
To get started, go to the WordPress dashboard of the site that you want to migrate and install the free version of the Duplicator plugin:
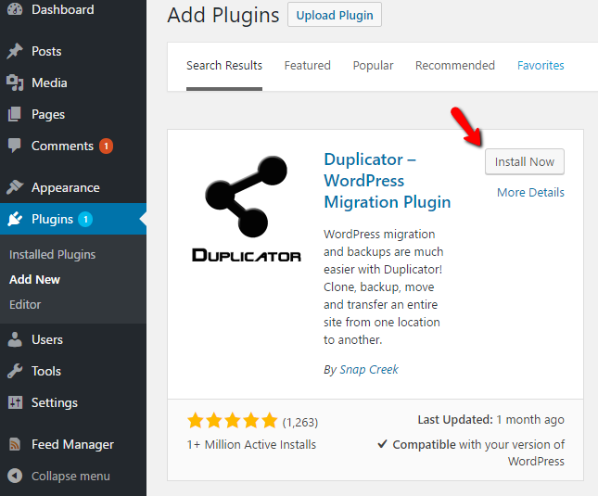
Make sure to activate the plugin after you install it.
Step 2: Create a New Package
In Duplicator’s terminology, a “package” is basically a self-contained version of your site. It contains two files:
- A .ZIP file of all of your site’s data, including both your files and your database.
- An installer file that allows you to easily turn this .ZIP file into a working copy of your WordPress site.
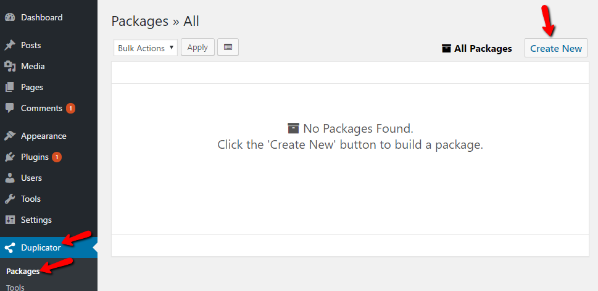
To create your first package, head to Duplicator → Packages → Create New:
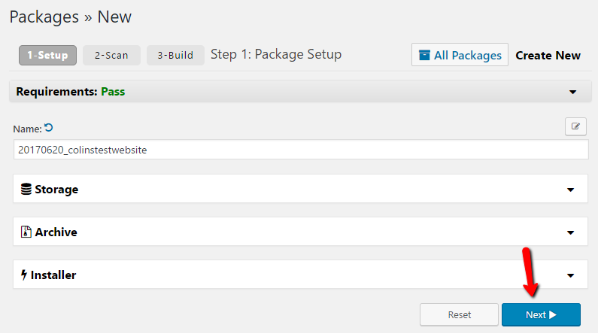
On the next screen (Package Setup), there’s nothing that you need to configure. Just click the Next button:
Duplicator will then run a scan of your site to detect any potential problems. In my example screenshot, you can see that it’s warning me about the total size of my site. Most of the time, the backup should work fine even with the warnings unless you’re on extremely budget shared hosting.
Just click the Build button at the bottom to continue:
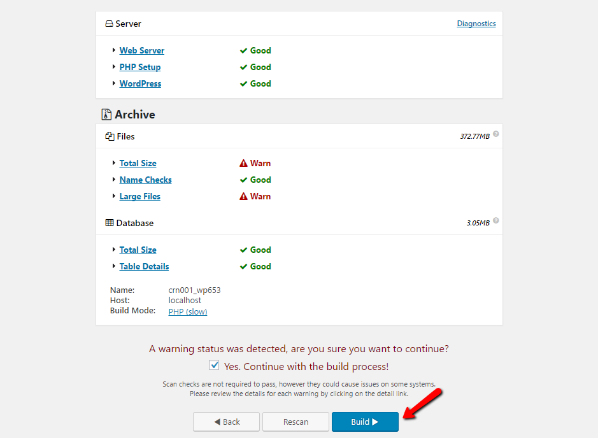
Depending on the size of your site, the build process might take a few minutes to complete. Once it’s done, you should see links to two different files:
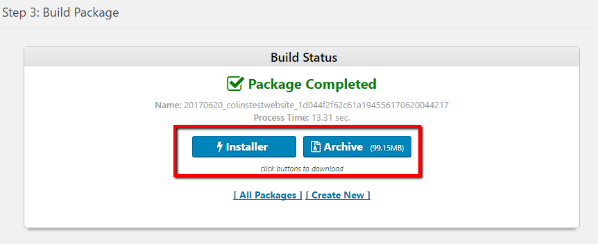
Make sure to download both files because you’ll need them to complete the migration. Again, here’s all each file contains:
- Archive – a backup of your site’s database and files.
- Installer – a PHP file that handles the process of installing your archive on your new server.
Step 3: Upload Archive and Installer Files to New Server
Next up – you need to upload the two files (that you just downloaded) to your site’s new location. To do that, you’ll need to either connect to that server via FTP or use cPanel’s File Manager. You can use a free FTP program like FileZilla to connect to your new host.
Note – if you’re having trouble connecting to your server via FTP, you should ask your host to help. They’ll know exactly how to help you get connected.
Once you’re connected, upload the archive and installer.php files to the directory you want to migrate your site. Most of the time, that will be the root directory. It should look something like this when you’re done:

Step 4: Create a New Empty Database
One more step before you get to actually run the installer and check out your migrated site! Now, you just need to create a new database on the server you’re migrating your WordPress site to. This database will house an exact replica of your existing database.
But because Duplicator can’t create a database by itself, you’ll need to create a new database through cPanel and provide those details during the Duplicator install process.
To do that, head to your cPanel dashboard and find the MySQL Databases button:

Then, create a new database at the top:

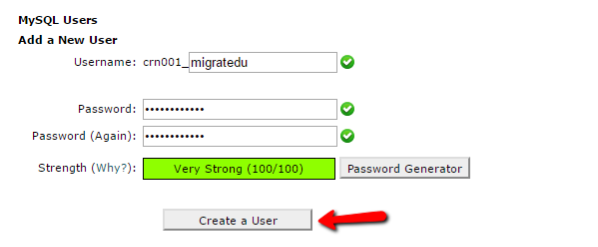
Once you create your new database, you need to also create a new database user and give that user access to your new database.
To do that, you just need to scroll down to the Add a New User box and enter details for your new user:
Then, further down the page, you can Add a User to a Database:

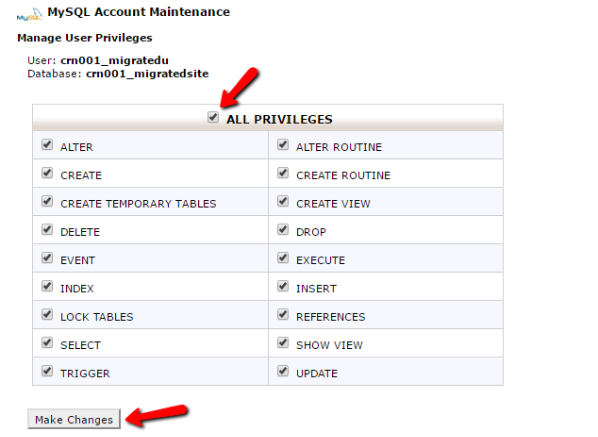
Make sure to give the user All Privileges on the next screen. And then you’re good to go.
Step 5: Run the Duplicator Install Process
At this point, you’re ready to run the actual Duplicator install process. Just make sure to keep the database credentials you just created handy because you’ll need them during the process.
Assuming you installed WordPress in your root folder, you can get started by going to yourdomain.com/installer.php. For subfolders, just make sure to add the relevant subfolder before the “/installer.php” part.
If you’re just migrating your site to a new host with the same domain name, you should use your regular domain name. But if you’re migrating your site to a new domain name, you need to use your new domain name. Don’t worry – if you’re changing domain names, Duplicator will handle switching everything over.
When you access the URL, you should see a Duplicator interface:
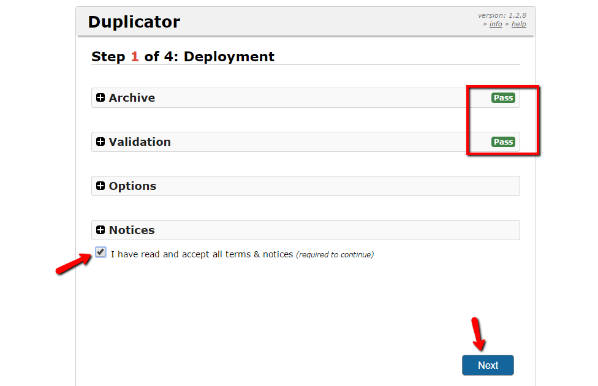
Just check the Terms and Conditions box and click Next to get started.
On the next screen, you need to enter the database name, user, and password that you created in Step 4. Then click Next:
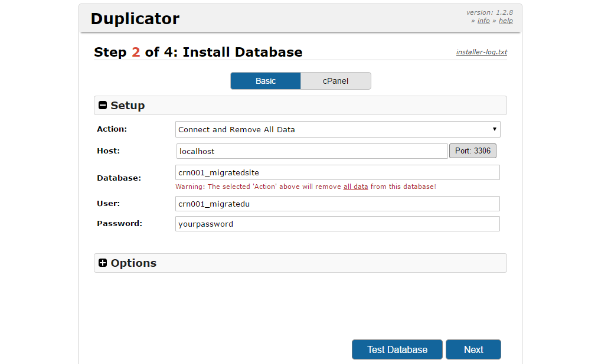
Confirm the information in the following prompt and then Duplicator will run the install.
If you’re switching domain names, Duplicator will automatically detect the change and update your database to ensure that everything still works properly. On the other hand, if you’re sticking with the same domain name, Duplicator won’t make any changes.
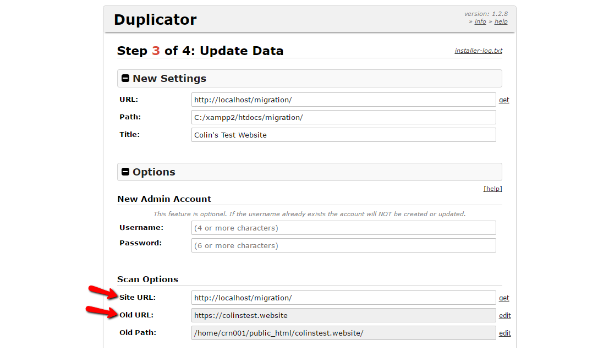
Basically – it’s 100% hands-off, which is one of the reasons Duplicator is such a great plugin.
Unless you want to create a new WordPress admin account, you can just go ahead and click Next without changing anything.
And that’s it! You just migrated your WordPress site the easy way.
You’ll definitely want to play around with the migrated version of your site to make sure everything is working properly just in case. But everything should function exactly the same as before the migration.
Additionally, it’s a good idea to re-save your permalink structure by going to Settings → Permalinks and just clicking the Save Changes button without making any changes. This ensures your .htaccess file is working properly.
Wrapping Things Up
While you can migrate your site manually by exporting and importing your database, as well as manually copying over all your files…there’s a reason that the Duplicator plugin has been downloaded over 6 million times.
Save yourself some time and frustration by following the instructions above and using the Duplicator plugin to migrate your WordPress site for free.

