WordPress was launched way back in 2003 and ever since then, it has been playing a significant role in the way people built and manages websites. Owning websites and growing small and big businesses became so much easier with WordPress. Especially because of its extremely user-friendly interface. This became the reason for its rapid growth over the last decade.
Today WordPress is used by more than 60 million websites. What makes it even better, is its regular updates. And each update seamlessly enhancing the customer experience in a more positive and enriching way.
 Exclusive WPEngine Coupon Code for AlienWP Visitors!
Get 5 Months Free & 30% Off All Plans.
Click the coupon code to copy and open the link »
However, things are not the same now, as it was back in 2003. Today, WordPress finds itself in the midst of tough competition from platforms such as Ghost, Joomla and recently Medium and Wix.
In a bid to make WordPress a go-to site for anything – from personal blogging to a small business websites, the new Gutenberg Editor was launched. The editor was first introduced by Matt Mullenweg at the World Camp Europe in 2017. It was named after Johannes Gutenberg, the person who designed the mechanical printing press.
This launch of Gutenberg Editor on the 6th of December 2018 created a lot of excitement and fuss among its users. So what exactly is the Gutenberg Editor? Let’s have a quick look.
What Is The Gutenberg Editor?
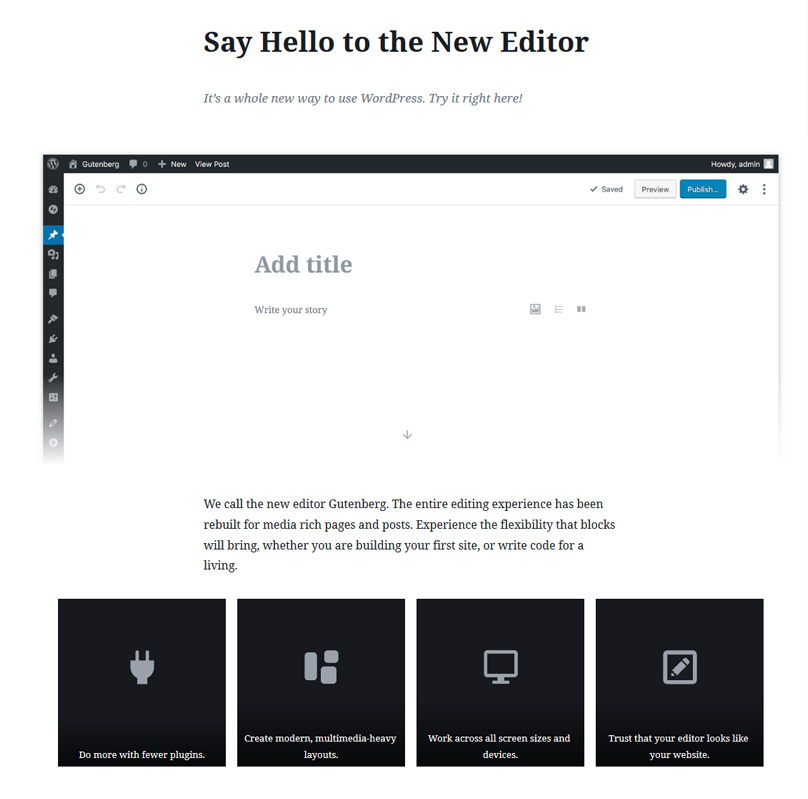
Gutenberg is a block-based editor that allows users to create complex posts/pages effortlessly and without coding a single line. It is aimed to make blogging easier for the newbies who have no professional knowledge of web designing.
In the old Classic Editor, we had to use a lot of shortcodes and HTML in order to make things work. This will not be the case anymore as Gutenberg Editor uses blocks to add more advanced layout options. These blocks can be a paragraph, images, buttons, tables, list, columns etc.
You can easily rearrange blocks from one part of the post to another. And as each block is not linked to the rest of the content, you can customize a particular block while all the other blocks remain the same.
Also, all the WordPress themes are now compatible with Gutenberg Editor as it is the default editor. Having said that, if you select a theme specially meant for Gutenberg Editor, it will offer some real benefits.
In short, these blocks give you more options to express your creativity and make your post stand out. The Gutenberg editor is perfect for websites meant to appeal people with its looks and media content. You can use it to create the most advanced look for your site by choosing to place and adjust your content strategically to appeal to your visitors.
How to install Gutenberg?
If you have a WordPress website, you should have got a pop up telling you about a new editor. You just had to click on that pop-up and start using the Gutenberg Editor for creating your posts You can even give them a great layout now.
Till the release of the WordPress 5.0, it was available as a plugin. However, Gutenberg Editor is now the default editor. But you always have the option to disable Gutenberg Editor and continue with the classic editor via use of a free plugin.
As of writing this, Gutenberg Editor had more than 2 lakh active installations and is active in 45 languages. If we check the ratings, we see that the opinions of the vast majority of users are divided and so far it is not great.
A lot of people are still not being able to welcome the huge change that the Gutenberg editor has brought in. Unlike the Classic Editor, Gutenberg is a lot more complex, with having to add all the blocks and elements separately for each new paragraph. So there is a learning curve that comes in with this editor. And that’s okay because with every new invention there is something new to be learned. Gutenberg is no exception.
Now that we are familiar about Gutenberg Editor, let us see how to use it on your website.
Getting Started With Gutenberg
If you are using the WordPress version 5.0, then Gutenberg is surely your default editor. Unless, of course, if you have installed the old classic editor plugin. So let’s check out how easy it is to use this editor.
So this is how your editor will look like.

In the above editor, the ‘+’ sign lets you add new blocks to your page or post.
Adding New Blocks
To add a new block to your draft, you just need to click on the ‘+’ sign on the left top corner of your document. You will then have a small screen pop up asking you to choose your content type. Select the paragraph option, if you want to type your text. If not, choose the block type according to your requirement.

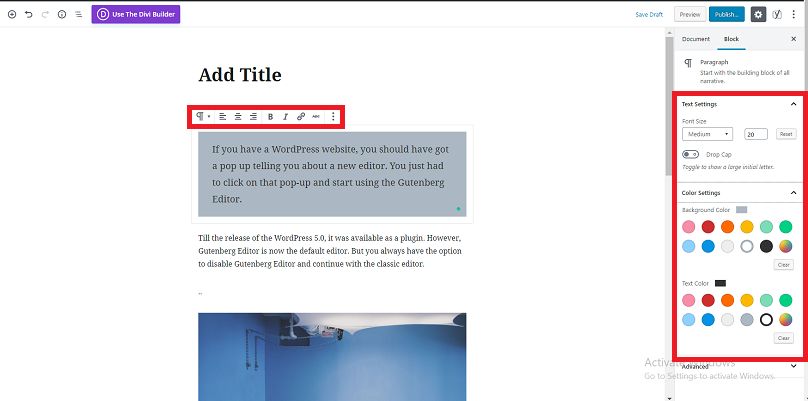
Now if you want to style your text, you can use the basic styling options that will automatically appear above your block everytime you hover over it. So you have the bold, italics, underline, alignment and insert link option here.
But if you want more advanced styling options, you can access them on the right-hand side of your screen under the Block tab. Just click on the block you want to make the changes and continue making the edits. You can change the font size and color, add a different background and more.
Adding a Non-Text Block
Adding a non-text block is as easy as adding a text block. Just click on the ‘+’ sign on the top left corner and select the image option to insert an image.
You will then have the option to upload the image from your computer. This is similar to uploading an image in your classic editor. The image will be stored in your media library and you can then have it in your post.
Here’s how it will appear on your editor.
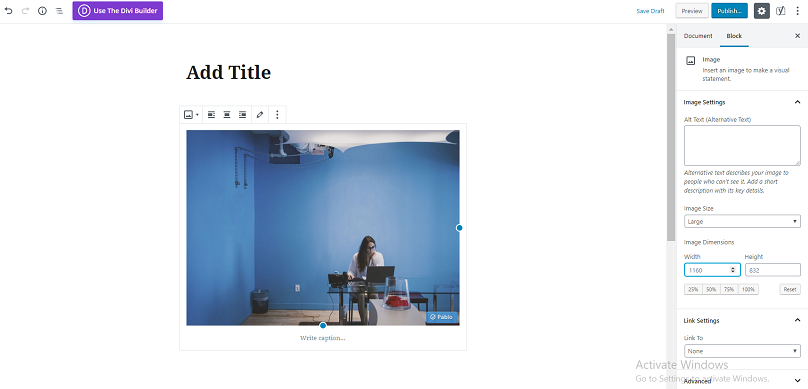
To the right side of your screen, you can see the options to insert your tags, alter your image size etc.
Uploading an audio file, a gallery of images, a cover needs you to follow the same process. Just select the type of content and upload the file from your computer.
Let’s now check how to insert a quote. Just click on the ‘+’ sign again and select the Quote option. Type in your quote for it to reflect on your page or post. To delete the quote block keep clicking on the backspace button until you have it removed.
Adding Columns
To add columns to your draft, just click on the ‘+’ sign to add a new block. Now go to Layout elements.
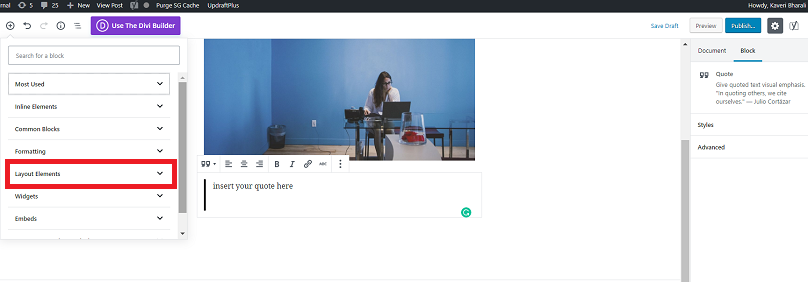
You will have the following options to select from. Select the Columns option to add it to your draft.

Your columns will reflect like this on your screen.
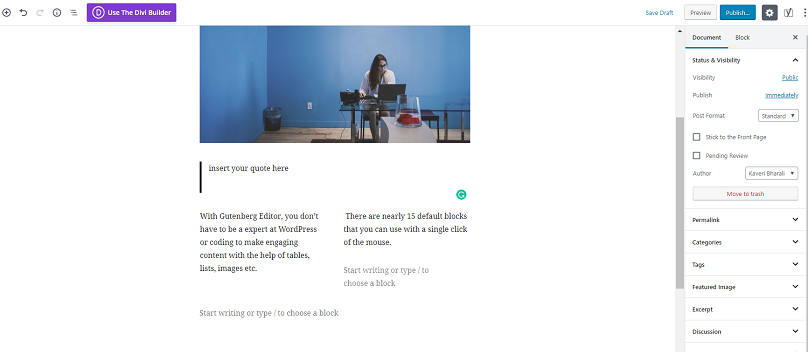
You can also select the buttons, page breaks, separators, read more option, that are all available under the Layout Elements.
Rearranging Individual Blocks
Sometime after creating your draft, you may feel that a certain block should have been below or above another. So what are the options to rearrange them?
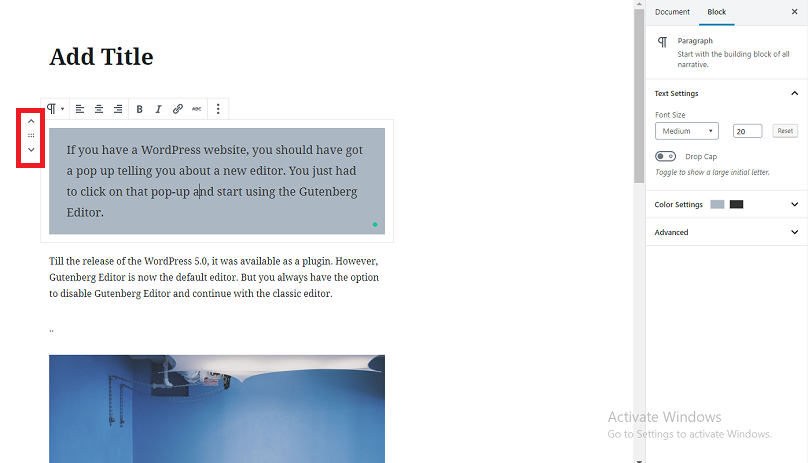
Gutenberg allows you to do that too. You just have to hover over the block you want to rearrange. You will see 2 Up and Down arrows appear on the left side of your block. Use them to place your block in the required position.
You can also use the drag and drop option by clicking on the six dots that will appear between the Up and Down arrows.
Using The Gutenberg Shortcuts
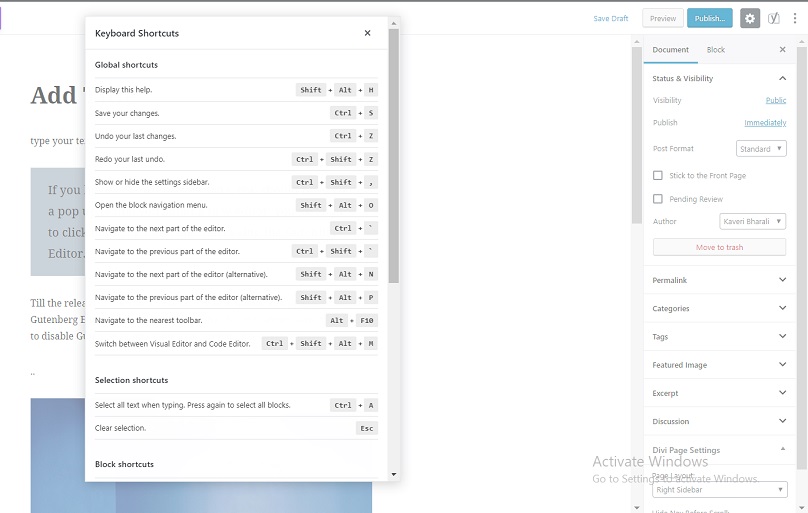
Now unlike the Classic Editor, Gutenberg comes with a long list of shortcuts that can be used for quick results. These are the additional shortcuts that you will get to use other than the standard formatting ones.
You can open the shortcuts list by clicking on Alt+shift+H. You will have the following pop up on your screen.
Creating Reusable Blocks
So with Gutenberg, you can also create a bunch of reusable blocks that can be used later for any other post or page that you create. These blocks can be named separately to easily identify them at the time of using them later.
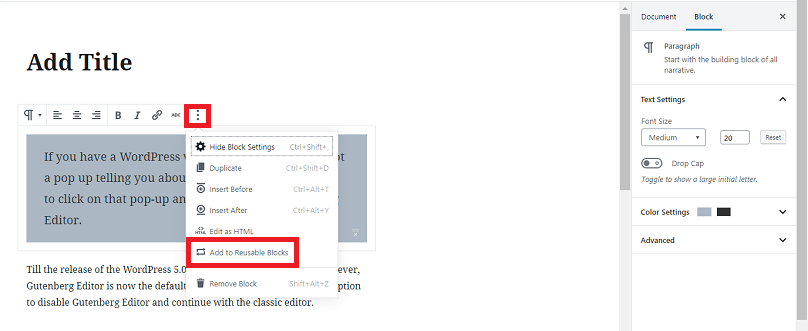
To create them, you will first have to select the block you want to include. Now click on the 3 dots icon. You will see several options pop up. Select the ‘Add to Reusable Blocks’ option.
In the beginning, Gutenberg may seem like a bit too much, especially if you have loved the classic editor. With all the block creation and design options, you may find it a bit confusing. But once you get used to it, you will surely love it with all its flexibilities.
Adding Buttons With Gutenberg
Adding buttons has never previously been so easy on WordPress. In the classic editor you had to use shortcodes or CSS to add buttons to your draft, but here things are completely different.
To add a button to your post, you simply click on the ‘+’ just where you want your button to be. Now go-to Layout Elements>Buttons
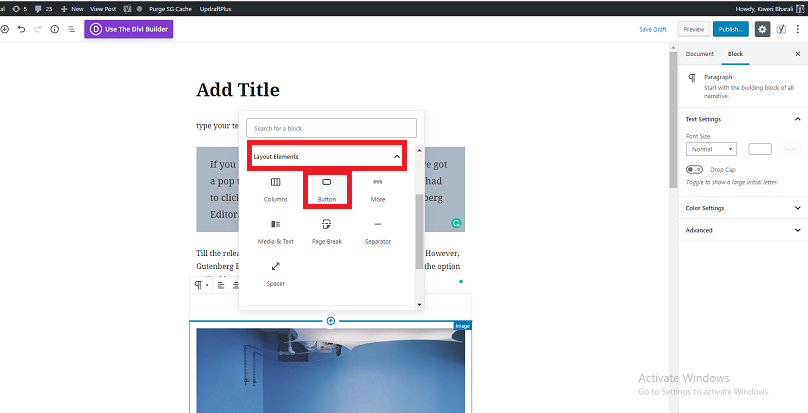
Your button will appear on your screen now. You can add the link to which your visitors should be directed on clicking on the button.
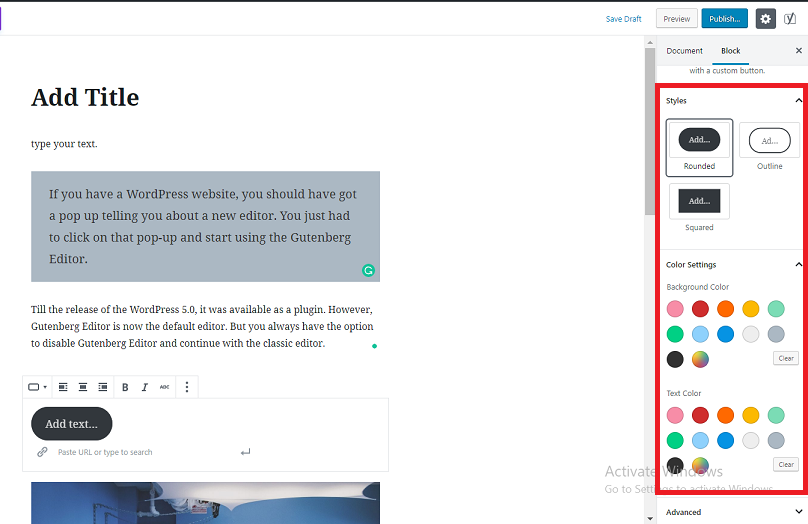
The default button appears to be oval in shape and black in color. You, however, can change the button style and color to complement your website design. To make these changes, you will see the option on the right side of your screen. Here you can select the button shape which comes in 3 different styles.
- Rounded
- Outlined
- Squared
You can choose whichever you want. You can also change the background color of your buttons. You have a whole lot of bright and fancy colors to choose from. The font texts can also be customized.
Can You Deactivate Gutenberg?
Although Gutenberg is a great option for content and media-rich websites, you may or may not be too fond of it in the beginning. So what if you don’t like the new editor experience?
Well, you simply go back and install the old editor. Since Gutenberg is currently the default editor, if you want to remove it, you will have to install the old classic editor which is available in the form of a plugin. The plugin already has more than 2 million downloads.
Uninstalling Gutenberg & Activating The Classic Editor
To go back to your old Classic Editor, go to your Dashboard>Plugins>Add New. Now, look up for the Classic Editor Plugin. Once you find it just go ahead and click on the install and Activate button.
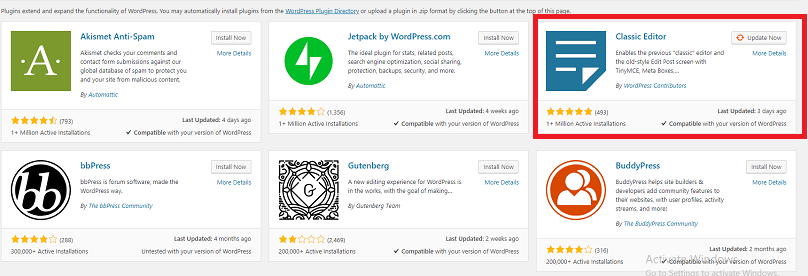
I already have the plugin installed on my site. Since it is currently deactivated it appears with the Update button. But if you have not installed it before the Update Now button will appear as Install Now at your end.
Once your plugin is activated, you can get back to the old editor and start working just like you used to before Gutenberg popped up. Here is a screenshot of how your editor will now appear.

Conclusion
The Gutenberg Editor, without a doubt, the new face of WordPress. Although currently, it does have many cons, the developers are doing a great work resolving some of the queries users were facing. Soon you may be able to use this editor without any problem. Only time will tell whether the Gutenberg Editor has fulfilled all that it was supposed to do.

