Want to add Font Awesome icons to WordPress? Icons help add style and usability to your WordPress site. And of the many font icon collections out there, Font Awesome is one of the absolute best.
But unfortunately, you can’t just jump in and start using Font Awesome icons on WordPress right away. Instead, you’ll need to complete some setup steps before you can insert icons.
 Exclusive WPEngine Coupon Code for AlienWP Visitors!
Get 5 Months Free & 30% Off All Plans.
Click the coupon code to copy and open the link »
That’s what this guide is all about. When you finish reading, you’ll know exactly how to:
- Manually add the Font Awesome stylesheet to WordPress
- Add Font Awesome to WordPress with a free plugin
- Insert and style Font Awesome icons in a variety of different ways
Let’s dig in…
Why You Should Take the Time to Add Font Awesome Icons to WordPress
Font Awesome icons are awesome because, as the name suggests, they’re an icon font, rather than images. That means you can do cool things like:
- Resize without losing quality because the icons are vectors
- Change colors, add animation, and use other CSS manipulations
All that to say, Font Awesome icons are far superior to just using a static image.
First, I’ll show you two different ways to add them to your site. Then, I’ll show you how you can style and manipulate your icons (no matter which method you choose).
How to Manually Add Font Awesome Icons to WordPress
If the thought of digging into your theme’s code scares you, I recommend that you skip ahead to the next section where I’ll show you how to add Font Awesome icons to WordPress using a free plugin.
Otherwise, I like this method for a nice, lightweight way to get Font Awesome up and running.
Basically, all you need to do is add the Font Awesome stylesheet to your WordPress theme. Then, you can start inserting Font Awesome icons and styling them however you’d like.
Here’s how the whole process works, step by step:
Step 1: Enqueue Font Awesome Stylesheet in Your WordPress Theme
Like I said, your first step is to add the Font Awesome CSS stylesheet to your WordPress theme. While you can get this directly from the Font Awesome website, my preferred method is to use the version hosted on Bootstrap CDN.
Currently, that link is:
https://maxcdn.bootstrapcdn.com/font-awesome/4.7.0/css/font-awesome.min.css
But it will change as Font Awesome releases new versions. So it’s a good idea to semi-regularly update the link to the latest version (though older versions will continue to work).
To add this stylesheet to WordPress, you need to enqueue it in your child theme’s functions.php file. While the basic method of adding CSS is to put the link in your header, it’s a best practice to use the special WordPress enqueue function instead of putting the stylesheet directly in your header.
Additionally, using a child theme ensures that your changes don’t get overwritten if you ever need to upgrade your theme.
Because following WordPress code best practices is a good thing, I definitely recommend you use both a child theme and the enqueue function.
Ok, here’s how to do it:
Go to Appearance → Editor and select the functions.php file for your child theme.
Then, paste in this code:
add_action( 'wp_enqueue_scripts', 'enqueue_load_fa' );

function enqueue_load_fa() {

wp_enqueue_style( 'load-fa', 'https://maxcdn.bootstrapcdn.com/font-awesome/4.7.0/css/font-awesome.min.css' );

}
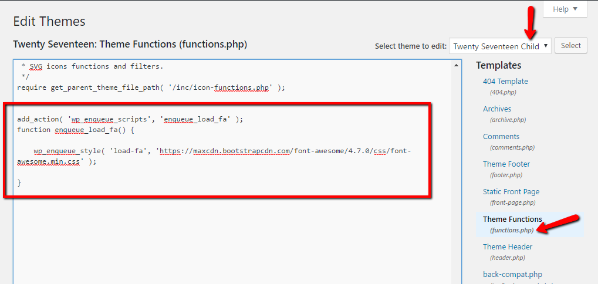
Make sure to save your changes and you’re finished! Not too painful, right?
Step 2: Insert Font Awesome Icons
Once you’ve enqueued the stylesheet, you can insert Font Awesome icons into your site by going to the Font Awesome icon search and finding an icon that you want to insert:

When you click on an icon, Font Awesome will give you the code that you need to use the icon:
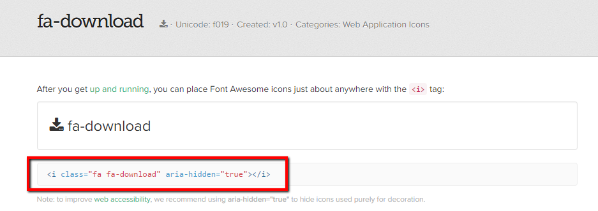
All you need to do is place that code in the Text tab of the WordPress Editor to add an icon to your site.
And that’s it! You’ve successfully added Font Awesome support to WordPress. Now, all that’s left is to learn how to style Font Awesome icons on your WordPress site.
But before I show you that, I want to go over the plugin method for adding Font Awesome Support. Feel free to skip ahead if you went with the manual method over the plugin method.
How to Add Font Awesome Icons to WordPress With a Plugin
If you’d prefer to use a plugin instead of manually enqueuing the Font Awesome stylesheet, there’s a solid free option listed at WordPress.org called Better Font Awesome.
In addition to always adding the latest stylesheet to your site, Better Font Awesome also:
- Lets you use shortcodes to embed Font Awesome icons.
- Gives you a drop-down menu in the TinyMCE Editor to insert icons.
If you’re planning to regularly use Font Awesome icons, these two tools might make your life easier. But for infrequent usage, I think the manual method is the simplest option because it’s the most lightweight.
Step 1: Install and Activate the Plugin
To add Font Awesome, all you need to do is install and activate the plugin. There’s really nothing else.
While there is a basic settings panel that you can access by going to Settings → Better Font Awesome, you’re totally free to leave everything as the default.
Step 2: Insert Font Awesome Icons
To insert Font Awesome icons with the plugin, you have two different options:
- Use the code from Font Awesome’s website like I demonstrated in the previous section.
- Use shortcodes, which can be generated from a drop-down.
Because I already showed you the first method in the previous section, I’ll just give you a quick look at the drop-down shortcode generator.
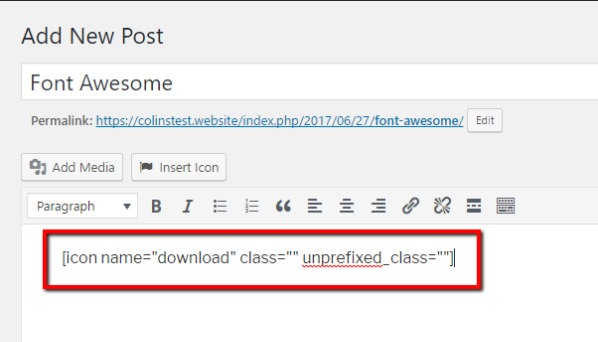
When you go to create a new post or page, you’ll notice a new Insert Icon button next to the Add Media button. If you click on it, you’ll see all the available Font Awesome icons, as well as an option to filter the results:
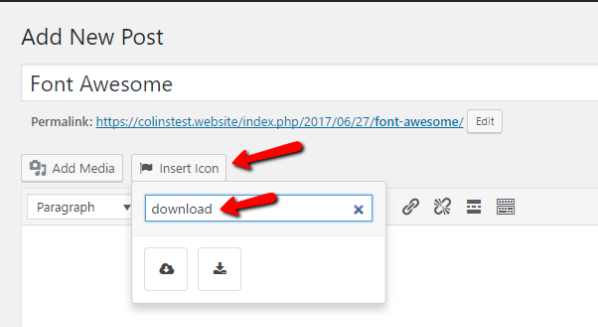
All you need to do is click on your chosen icon and the plugin will insert the proper shortcode:
And that’s all there is to it!
Now that you have Font Awesome icon support, let’s dig into some ways in which you can style and manipulate your Font Awesome icons.
How to Style Font Awesome Icons and Change Sizes
No matter which method you used to add Font Awesome to WordPress, you’ll use the same basic principles to style your icons.
Additionally, these commands work whether you’re using shortcodes or the embed code from Font Awesome’s site.
Most of these tips are pulled straight from the Font Awesome examples page, so you don’t need to worry about compatibility.
Change the Size of Font Awesome Icons
Let’s start with a basic one – increasing the size of your Font Awesome icons. By default, the icons are fairly small, so this is definitely a situation you’re likely to encounter.
To increase an icon’s size, you can use any one of these modifiers:
- fa-lg – increases size by 33%
- fa-2x – doubles size
- fa-3x – triples size
- fa-4x – …
- fa-5x – …
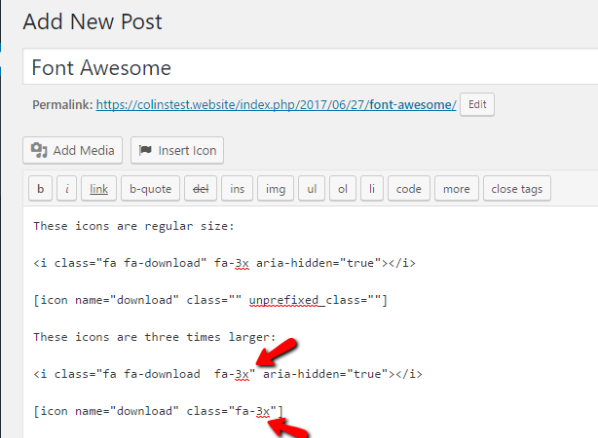
To use those modifiers, you just add it after the name of the icon (but inside the quotes) for the code, and inside the class quotations for the shortcode. Here’s an example of tripling an icon’s size for both embed methods:
- <i class=”fa fa-download fa-3x” aria-hidden=”true”></i>
- [icon name=”download” class=”fa-3x“]
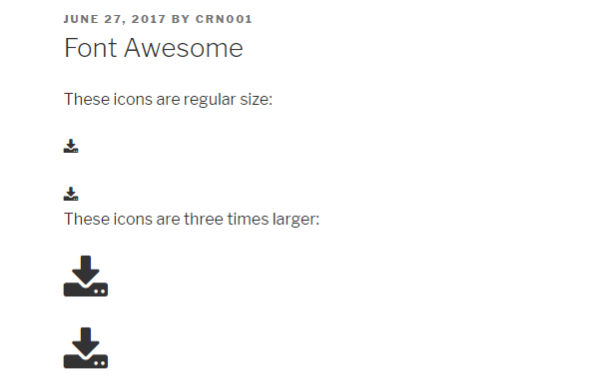
For example, this:
Becomes this on the front-end:
Rotate Font Awesome Icons
You can also easily rotate Font Awesome icons to change their orientation.
Here are the modifiers for rotation. You can use any of these exactly the same as the size modifiers above:
- fa-rotate-90 – rotates 90 degrees
- fa-rotate-180 – rotates 180 degrees
- fa-rotate-270 – rotates 270 degrees
- fa-flip-horizontal – flips the icon along its horizontal axis
- fa-flip-vertical – flips the icon along its vertical axis
Add Animation to Font Awesome Icons
You can also add some basic animations to your icons. Font Awesome gives you two different modifiers to add rotations:
- fa-spin – adds a smooth rotation
- fa-pulse – makes the icon rotate in 8 different steps
These animations are best paired with circular icons. If you use other oddly shaped icons, the effect might look a bit weird.
Change Font Awesome Icon Color
Finally, I’ll show you how to change the color of Font Awesome icons. Unfortunately, there are no built-in modifiers for this. Instead, you’ll need to use some custom CSS.
Don’t worry, though – it’s super simple.
All you need is this little code:
.fa-NAME {

color: COLOR;

}
Where fa-NAME is the actual name of your icon and COLOR is the color you want to change it to.
To stick with the download icon from our previous examples, here’s how you would turn it red:
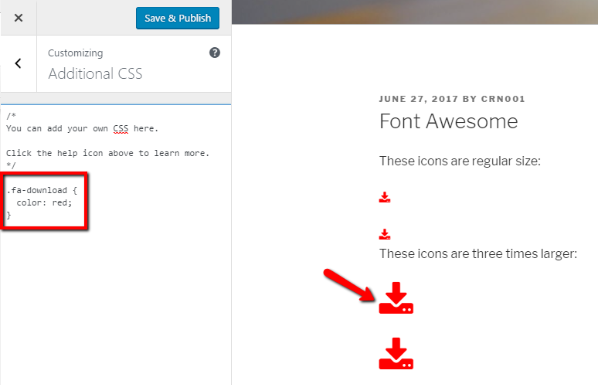
You can easily add custom CSS by going to Appearance → Customizer → Additional CSS.
Wrapping Things Up
Font Awesome icons might take you a couple of minutes to set up. But once you have them installed, they’re there for good. From then on, all you need to do to insert and style individual Font Awesome icons is follow the steps above.
Just be aware – if you use the manual method, you’ll want to periodically go in and update the link to the stylesheet to stay abreast of the latest versions.


