Struggling with how to embed Google Maps in WordPress? There are tons of reasons you might want to display Google Maps on your WordPress site, for example you might have a business website and you want to add a map to your “contact” page so customers can find you. You might need to list multiple locations if you have physical stores or offices. You might want to create a review website and let people leave reviews of physical locations etc. What ever the reason out of the box, WordPress doesn’t make it very easy for you to work with Google Maps.
So let’s change that! In this post, you’ll learn a few different ways that you can embed Google Maps content into WordPress. We’ll start with the basics – embedding a single map. Then, we’ll build up to how to embed maps with multiple location markers via both manual and plugin methods.
 Exclusive WPEngine Coupon Code for AlienWP Visitors!
Get 5 Months Free & 30% Off All Plans.
Click the coupon code to copy and open the link »
How to Embed a Single Google Maps Location In WordPress
Let’s start with the most basic way to show a Google Maps location on your WordPress site. If you just want to embed a map with a single location or view, you don’t need any fancy tools or plugins – all you need is to paste the Google Maps embed code into your WordPress site.
Here’s how it all works:
Go to the Google Maps website like normal and search for the location that you want to embed. You can search for anything. That is:
- An entire country
- A specific city
- A specific business
- You name it
It doesn’t really matter!
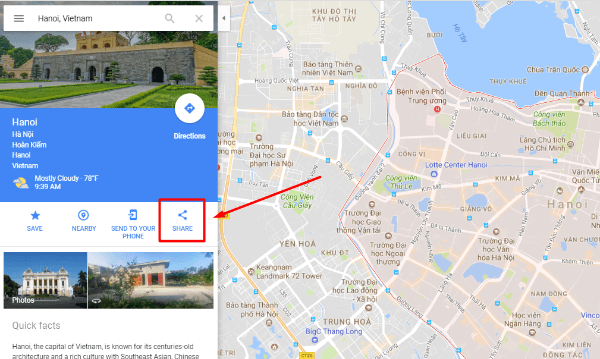
Once you have the location that you want to show on your map, look for the Share button in the left sidebar:
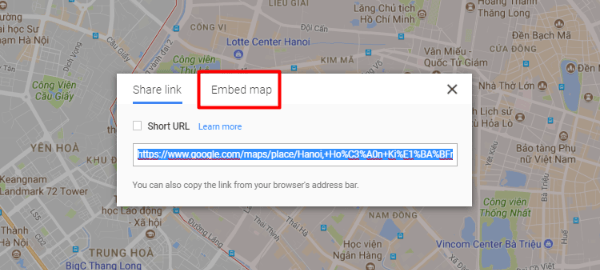
You should see a small popup appear. Click the Embed map option in that popup:
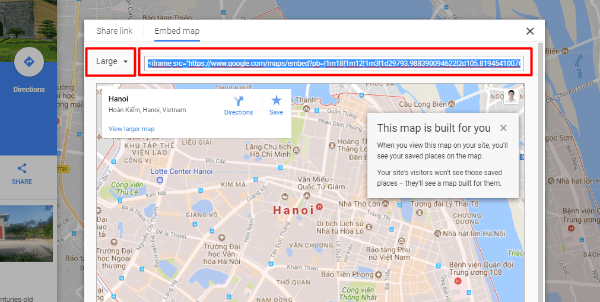
Then, choose your desired size from the drop-down. And once you’ve selected the size that you want, copy the code in the box:
Now, head to the WordPress post or page where you want to embed the Google Maps box.
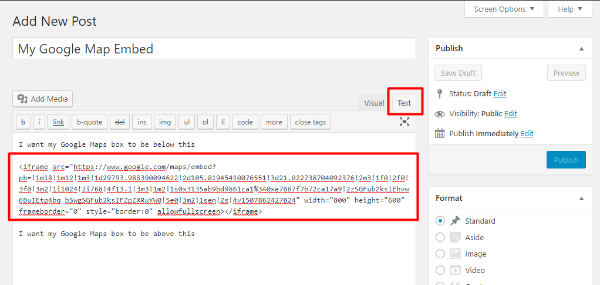
In the WordPress Editor, toggle over to the Text tab and paste the code that you copied from Google Maps at the spot where you want your map to appear:
Now, publish your post like normal and you should see your Google Maps box on the front-end of your WordPress site:
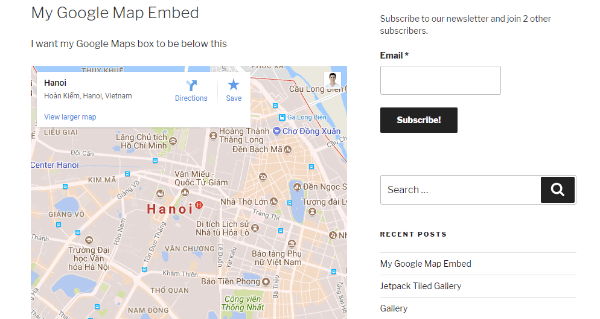
Easy enough, right?
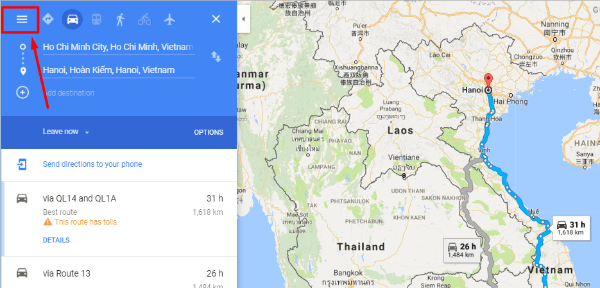
You can also use a similar method to embed Google Maps directions in WordPress. The only difference is the starting interface. Instead of seeing the Share button right away, you’ll need to click the hamburger icon and choose the Share or embed map option:
How to Embed Google Maps With Multiple Location Markers Into WordPress
If you want to embed a Google Maps box with multiple location markers into WordPress, things are a little bit different.
While I will show you two Google Maps WordPress plugins to help you accomplish this in the next section, you don’t actually need a plugin to do it.
Instead, you can create your own map using Google My Maps and then embed that map in WordPress using a similar method to the one outlined above.
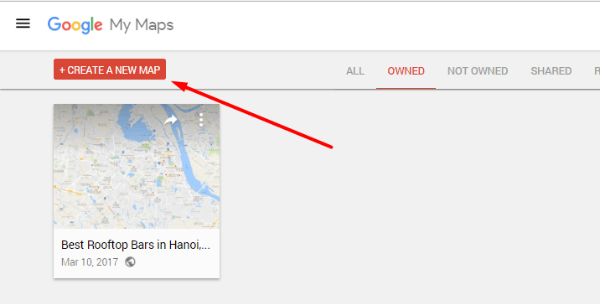
To get started, head to Google My Maps and click Get Started to launch the interface. In the interface, click the option to Create a New Map:
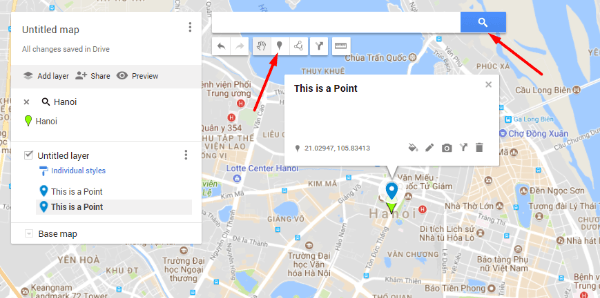
Then, use the interface to build your map. It can be a little tricky to get started – but once you get the hang of things, it’s pretty easy to use. You can search for things by using the search box, and you can add markers on the map using the Marker button:
Once you’re happy with your map, click on the Three Dot icon at the top and select Embed on my site.
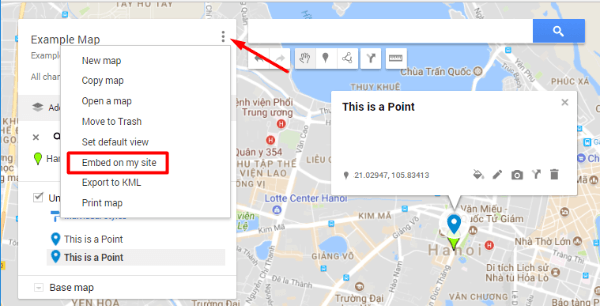
Then, just like before, you can paste the code that Google Maps gives you into the Text tab of the WordPress Editor to display the map on your WordPress site.
WordPress Plugins To Help You Work With Google Maps Even More
While you don’t really need a plugin to handle basic Google Maps embedding like I showed you above, plugins can come in handy if you want more flexibility (or if you want a more user friendly way to implement that flexibility).
Most plugins don’t really do anything that you couldn’t do by yourself with enough elbow grease – but they do make it a heckuva lot easier and more user friendly. Here are some neat plugins to help you work better with Google Maps.
WP Google Maps
WP Google Maps is the most popular free Google Maps plugin at the WordPress.org plugin directory.
It helps you create your own custom Google Maps displays using map markers that you choose and different map themes. Basically, it’s a more user friendly implementation of the process that I just outlined above.
The only downside is that the free version only lets you create a single map. If you need multiple maps, you’ll need to either purchase the premium version or use a different solution.
To get started, install and activate WP Google Maps. Because it’s listed at WordPress.org, you can do that directly from your WordPress dashboard.
Once you activate it, go to the new Maps option in your sidebar to get started.
Before you can create your first map, though, you’ll need to obtain a Google Maps JavaScript API Key and enter it in the plugin’s settings. You can do that by following these instructions:
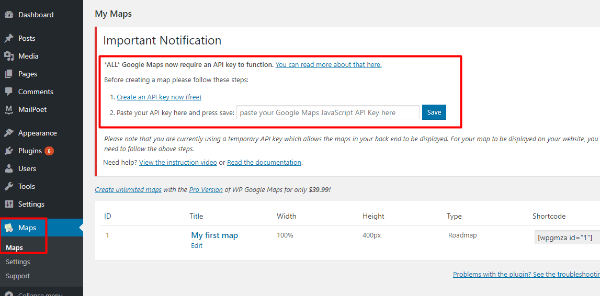
Once you enter your API key, you can edit the default My first map (remember – the free version of this plugin only lets you create one map):

Use the interface to build your map. Then, when you’re finished, you can embed it anywhere on your site using the shortcode:
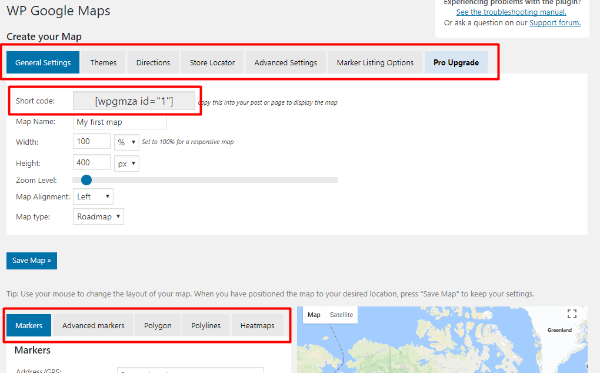
It’s super easy and flexible – the only downside is the one map limitation in the free version.
Maps Builder
Another good option for creating Google Maps embeds with a WordPress plugin is Maps Builder.
Once you install and activate the plugin, you’ll get a new Google Maps tab in your dashboard sidebar. As with WP Google Maps, you’ll need to add a Google Maps API Key before you can get started with the plugin.
Once you do that, you can go to Google Maps → Add New to build a new map. In that interface, click the Open Map Builder button to launch the user friendly interface:
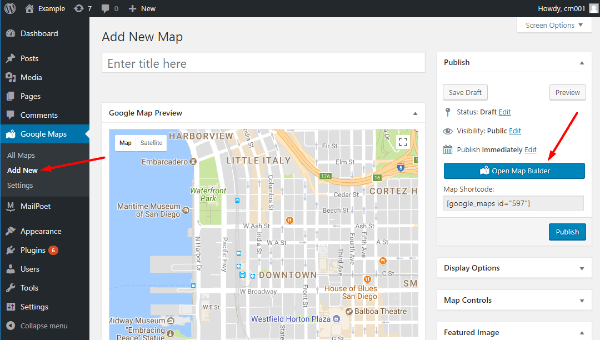
There, you can build your map using the plugin’s sidebar:
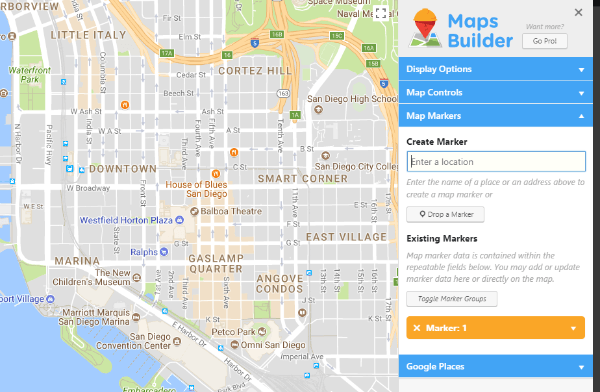
Once you’re finished, you can use the shortcode created by the plugin to embed the map anywhere on your WordPress site.
WP Store Locator
If you specifically want to use Google Maps to display multiple store locations on your WordPress site (a common desire!), you might be better off using a dedicated store locator plugin.
While you can find several plugins to do this, I like WP Store Locator because it’s flexible and looks great.
Use Your Favorite Page Builder’s Google Maps Module
Most WordPress page builders include a dedicated Google Maps element/module to help you embed Google Maps content in your designs.
For example, the popular Divi Builder plugin includes a Google Maps module that you can customize a fair bit via the plugin’s interface:
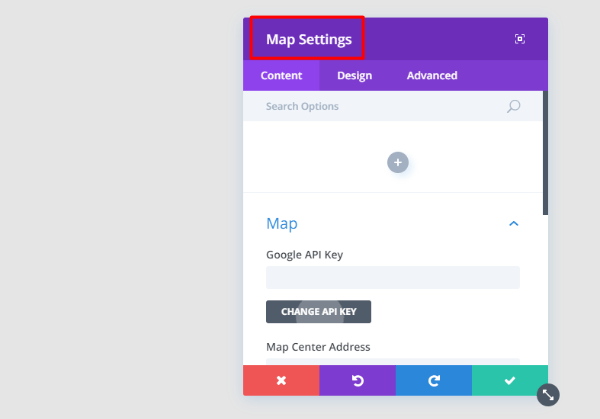
So if you’re already using a page builder, check to see if your page builder has a Google Maps tool before you go running off to find a dedicated Google Maps plugin,
A Fun Tweak For Advanced Users
This method is advanced and requires code knowledge – so if you’re a beginner, feel free to ignore this.
But if you know your way around WordPress and custom fields, you can use a custom field to automatically create a map based on the Google Maps Map URLs scheme.
For example, you can create a field on the WordPress backend where a user just needs to paste in the address to a location.
Then, with a little pre-processing to remove spaces, you can insert that address into something like below in an iframe in your theme’s template files:
And voila! All a user needs to do is enter an address in the WordPress Editor and a Google Maps embed will automatically appear on the front-end for that location.
Again – this method definitely requires a basic knowledge of PHP and custom fields – but it is a cool hack to save some time.
Wrapping Things Up
Whether you just want to do something basic like embed a regular Google Maps location into WordPress or get more advanced with multiple map markers or automatic map creation, you have plenty of options.
For embedding single maps, you can probably skip the plugins and just use the regular Google Maps embed code. But if you want to create maps with multiple locations and have easy control over styling, the two Google Maps plugins are good options.
And finally, if you’re using a page builder, you should definitely check to see if you already have a Google Maps element before you turn to an external solution.

