Have you been thinking of making the leap into WordPress Multisite? While it’s not as popular as vanilla WordPress, WordPress Multisite allows you to do a ton of cool things…if you understand how it works. If you want to run a network of websites which are all powered by WordPress and can share things like themes, plugins and users then Multisite is the solution. It is used to power many networks of websites which are owned by the same person, it can be used to allow people to signup for their own site under your umbrella and much more.
To help with that part, we’re going to give you a detailed guide to WordPress Multisite. We’ll cover what WordPress Multisite is, when it’s a good idea to use, and how you can actually install and configure your own WordPress Multisite setup.
 Exclusive WPEngine Coupon Code for AlienWP Visitors!
Get 5 Months Free & 30% Off All Plans.
Click the coupon code to copy and open the link »
There’s a lot of ground to cover so let’s get started right away!
What Is WordPress Multisite?
WordPress Multisite is a core WordPress feature that allows you to create a network of connected sites using WordPress. If you’re familiar with the concept behind WordPress.com, you should have a pretty good idea of how WordPress Multisite functions.
It originally started as a separate project called WordPress MU (short for WordPress Multiuser), but was eventually merged into the core WordPress software in WordPress 3.0.
While it is part of the core, it’s not active by default for new WordPress installations. Instead, you have to complete a few steps to actually activate and install WordPress Multisite (more on what those are in a second!).
What Does WordPress Multisite Let You Do?
Ok, we already told you that WordPress Multisite lets you create a network of connected sites. But how does that actually function?
Here are some specific features to illustrate what that actually means:
- You or your users can create new network sites as either subdomains or subfolders
- Sites on your network are able to share the same plugins and themes.
- The various sites share the same database
How Is WordPress Multisite Different Than Regular WordPress?
For the most part, WordPress Multisite uses the same interface that you’re already familiar with. But as part of creating a network, it does make some tweaks:
- You get a new Super Administrator role that has access to a Network Admin dashboard where the Super Admin can manage network-wide settings, themes, and plugins.
- Themes and plugins function differently. Instead of each site being able to install its own themes and plugins, the Super Administrator adds them in the Network Admin section. Then, depending on your settings, individual site administrators can activate or deactivate those plugins as desired.
When Should You Use WordPress Multisite?
WordPress Multisite is a cool tool, but it’s not the right solution for every situation.
Here’s when using WordPress Multisite IS a good idea:
- You want to let third-party users create their own sites on your network. This could be a public community or a situation like where a University allows its students to create their own blogs using WordPress.
- You have multiple, similar locations/groups that need websites with similar functionality. E.g. you could use Multisite to give each franchise location its own unique website, or each sports team in a league its own website.
You’ll also find some developers who advocate using WordPress Multisite as a tool to help you manage multiple disparate sites. While this technically does work, it’s a risky approach from a security perspective. Here’s why:
All the sites on your Multisite network share the same database. As a result, they’re all still connected in a single installation.
That means every site you put into your Multisite network has a single point of failure. If you’re working with client sites – that’s a risky approach.
How To Install And Activate WordPress Multisite
You can install WordPress Multisite on both an existing WordPress single site installation or a fresh installation. Regardless of whether it’s a new or fresh WordPress install, when you activate WordPress Multisite your existing single site will become the first site on your new network.
All you’ll need to activate WordPress Multisite is:
- An existing WordPress install – either a brand new install or an existing site
- Access to edit your wp-config.php file and .htaccess file. You can either edit these files using an FTP program or cPanel File Manager. We’ll use cPanel File Manager for our example screenshots.
Once you have those two things, you’re ready to get started!
Step 1: Add Code Snippet To wp-config.php
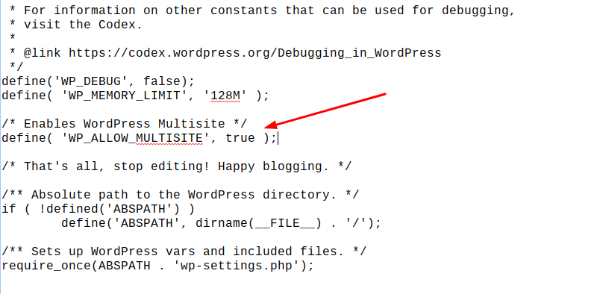
To get started, add the following code snippet to your wp-config.php file:
/* Enables WordPress Multisite */

define( 'WP_ALLOW_MULTISITE', true );
To make things simple, you should add this code snippet directly above the line for :
/* That’s all, stop editing! Happy blogging. */
Step 2: Follow Network Setup Steps in WordPress Dashboard
Once you save the changes to your wp-config.php file, head back to the WordPress dashboard for your site.
In your WordPress dashboard, go to Tools → Network Setup to set up your new Multisite network.
Right away, you’ll need to make an important, and permanent, decision. Do you want to use subdomains or subfolders for your network sites?
- Subdomains – each site gets its own subdomain like site2.mainsite.com
- Subfolders – each site gets a subfolder like mainsite.com/site2
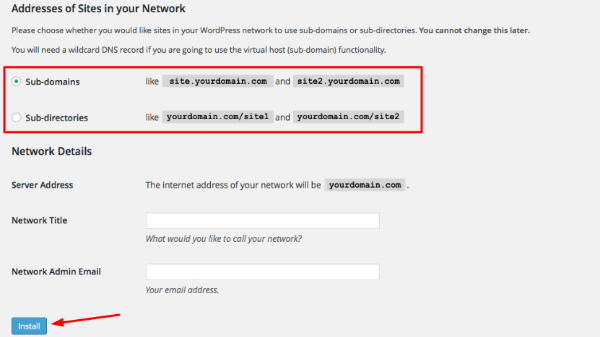
There’s no right answer – the decision is entirely up to your preference. Just be aware that if you choose the Subdomains function, you’ll also need to create a wildcard DNS record in order for it to function properly.
Once you make your decision, finish out the process by:
- Giving your network a Network Title – don’t worry, you can always change this later.
- Setting a Network Admin Email address.
- Clicking Install
Step 3: Add Two More Code Snippets To Your SIte’s FIles
Once you click Install, WordPress should show you a screen with two additional code snippets that you’ll need to add to your wp-config.php and .htaccess file, respectively:
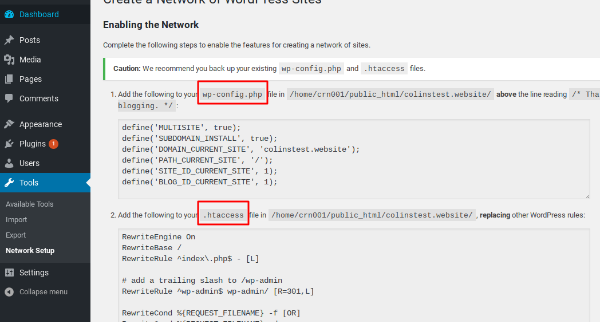
Go back to your FTP program or cPanel File Manager and add each code snippet to its respective file. Note that for the .htaccess code snippet, you should completely replace the existing WordPress code, rather than simply add the new snippet.
Once you save your changes – your Multisite network is live!
How to Configure WordPress Multisite
Once you activate WordPress Multisite, your journey isn’t quite done.
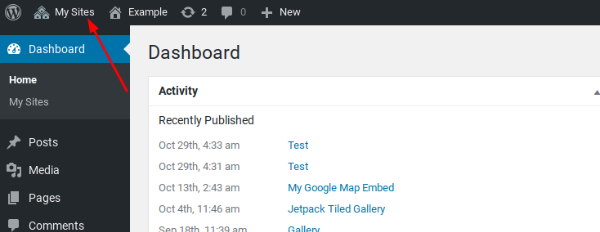
Next up – you need to actually configure your new network. You can access your network’s settings by hovering over the My Sites option and choosing the Network Admin option:
Inside the Network admin area, you’ll see a familiar interface, but with a number of new options:
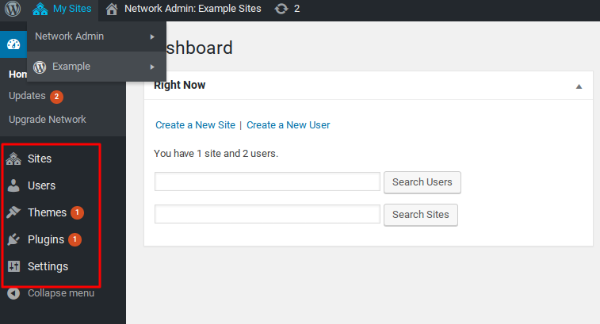
Here’s what the various tabs do…
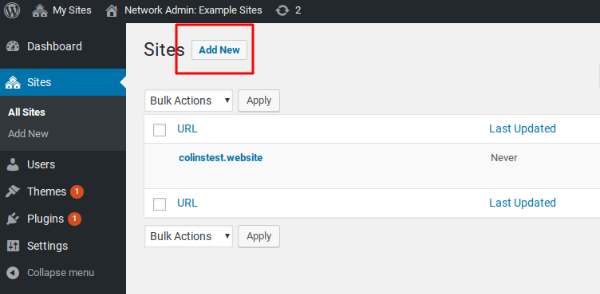
Sites Tab – Manage And Add New Network Sites
In the Sites tab, you can manage all of the current sites on your network as well as manually add new sites to it:
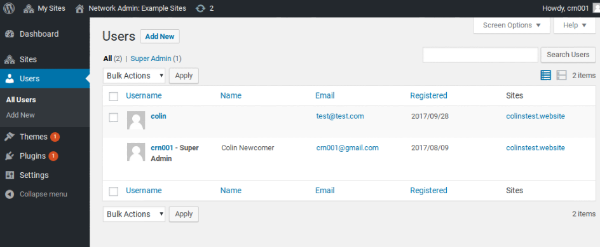
Users Tab – Manage All The Users On Your Network
In the Users tab, you can see all of the registered users on your network, as well as which sites each user is associated with. Depending on whether or not you allow public registration, this area may or may not be helpful:
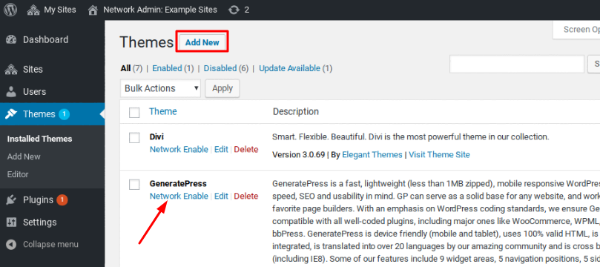
Themes Tab – Manage Available Themes For Your Network
The Themes tab is where things start getting interested. Here, you can install and enable/disable individual themes on your Multisite network.
When you install and enable a theme, you’re simply making it available to individual site admins to use. You’re not necessarily forcing them to use it.
The actual interface for adding themes is identical to WordPress single site:
Plugins Tab – Manage Plugins On Your Network
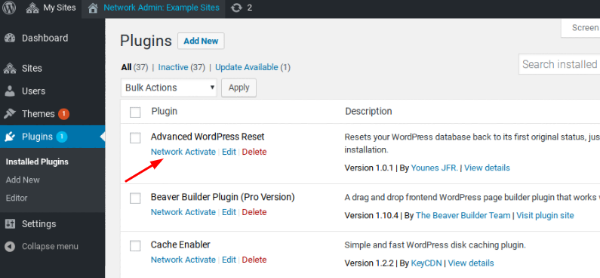
The Plugins tab is similar to the Themes tab, but with one small tweak. You can actually force your network sites to use specific plugins.
If you Network Activate a plugin, it will be active for all sites on your network. On the other hand, if you install a plugin but don’t Network Activate it, individual site admins may or may not be able manually activate it depending on how your configure your network in the Settings options.
Speaking of…
Settings Tab – Configure Miscellaneous Settings For Your Network
Finally, in the Settings tab, you can configure a bunch of additional options for how your network functions.
You have a ton of options and most are fairly self-explanatory, so we won’t cover every single option.
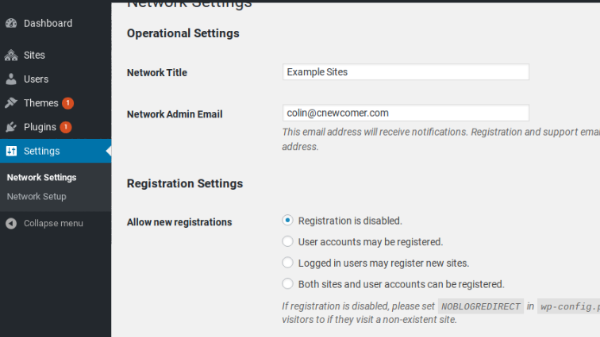
But here are some options you might want to pay specific attention to:
- Allow new registrations – decide whether or not you want to allow people to register and/or create their own network site.
- New Site Settings – configure the default emails/content for new sub sites.
- Enable administration menus – when checked, this lets individual site admins do things like manually enable specific plugins (though they won’t be able to deactivate a plugin that you’ve Network Activated.
Enjoy Your New WordPress Multisite Network
At this point, you should have a fully functioning and configured WordPress Multisite network. Depending on your settings, you’ll either be the sole owner of your network, or you might have individuals creating new network subsites.
No matter what, we wish you the best of luck with your new site and please leave a comment if you have any questions about WordPress Multisite!

