But if you want to do it – you’ll need for right tool. As far as that goes, I think WordPress is the best solution for most people to build a personal brand because with WordPress, you can build a website with all the necessary functionality without needing to know how to code.
In this guide, I’m going to give you some tips on exactly how you can build a personal brand with WordPress.
Let’s get started!
Think About What Goes Into Your Personal Brand
Ok, before you start using WordPress to build your personal brand, it’s important to think about what actually goes into a personal brand.
As a freelance writer who puts food on the table via my personal brand, this is an area in which I have some pretty good expertise.
Generally, here’s what you’re going to want on your personal branding website:
- Great domain name – most of the time this will be your actual name (or as close to your name as possible, if it’s already taken).
- Stellar WordPress theme – there are tons of WordPress personal branding themes that can help you showcase yourself in style.
- Killer homepage – your homepage is what most visitors will see first. You need to make it awesome with things like testimonials and skill lists.
- Portfolio – your portfolio shows what you can do. No matter what type of work you do, you can probably come up with a portfolio to build your credibility.
- Services – once you wow people with your portfolio, you need to actually tell them what type of services you offer.
- Contact form – what’s the point of building a personal brand if people can’t easily get in touch with you?
- Blog – this helps you get more traffic to your site and establishes your authority in whatever it is you do.
- Email list – this helps you stay connected with your visitors even after they leave your site.
Below, I’ll take you through how you can use WordPress to accomplish all of these!
Step 1: Pick A Host And Create Your WordPress Website
If you already have hosting and WordPress installed, feel free to click here to skip ahead to the next step. If not, let’s start at the beginning!
Before you can build a personal brand with WordPress, you need an…actual WordPress website to work with. Makes sense, right?
Well, if you want your own self-hosted WordPress.org site, you’re going to need hosting (WordPress.com isn’t a good option for building a personal brand – here’s the difference between WordPress.org and WordPress.com).
To get started, we always recommend Bluehost because:
- It’s affordable.
- You can install WordPress with one click.
- It has plenty of power to start you off.
- You get a free domain name when you sign up for hosting.
To get started, go to Bluehost and click the Get Started Now button:

On the next screen, choose your plan. To get started, the basic plan is fine (you can always upgrade later, if needed):

Next, fill in your desired domain name and click next:

On the next screen, you’ll need to enter your:
- Account information
- Package information – you don’t need to purchase any of the add-ons
- Payment information

Once you finish signing up for your account, you can install WordPress from your cPanel dashboard after logging in:

Follow the user friendly installation wizard to complete the WordPress installation process. Then, you’re ready to move on!
Step 2: Pick A Personal Brand WordPress Theme
You have a ton of options when it comes to choosing a theme for your new website. If you want to skim a huge list, check out this big list of 50+ personal brand WordPress themes.
If you’re looking for something a bit more curated, here are some of my personal favorite themes for building a personal brand.
Divi

When it comes to personal branding, Divi is probably the most popular option. It’s used by hundreds of thousands of websites, many of which are for personal brands.
Here are some reasons Divi is great for personal branding:
- It includes the Divi Builder page builder, which helps you implement many of the tips I’ll talk about in a second.
- It has pre-built templates to implement common features like portfolios, services, contact forms, and more.
- There’s a huge third-party community that you can turn to for support.
Divi is part of the $89 Elegant Themes package.
Authority Pro

Authority Pro is a personal branding theme for the Genesis Framework. It features a homepage that already integrates many of the principles I’ll outline in later sections. So if you want to save some time, it’s another great option.
Authority Pro costs $129.95, including the Genesis Framework.
Zerif Lite/Pro

Zerif is a freemium WordPress theme that makes it easy to build an engaging homepage for your personal brand. It’s also one of the most popular themes at WordPress.org, which means it’s easy to get help if you need it. There’s also a Pro version if you need more functionality.
Step 3: Build A Homepage That Showcases Skills And Testimonials
Once you choose your theme, it’s time to build a homepage that puts your personal brand front and center. That means including elements like:
- A short, attention-grabbing headline
- A scannable list of skills
- Testimonials from past clients/co-workers
- A call to action for an email list or offer (if you want to aggressively promote something)
- Other pertinent information
If you didn’t pick one of the themes above (or another similar theme that already includes a homepage template), you might need some help to do this. That’s why WordPress page builders were invented.
Check out this post for some of the best WordPress page builders.
With any of those page builders, you can add all the aforementioned elements without needing to know any code. All you do is drag and drop them on a live preview of your page until you like how your page looks!

This personal brand homepage was built with a page builder.
Step 4: Create A Portfolio So People Can See Your Work
Once you create your homepage, the next page that you’ll likely want to tackle is your Portfolio page. While not every single personal branding website needs a portfolio, if you’re planning to offer any services, it’s a must-have for building your credibility.
Many of the WordPress page builder page builders include pre-built elements or sections to help you quickly create a portfolio. Or, if you’re creating a visually-focused portfolio, you can use a free plugin like Portfolio Gallery.

An example of a portfolio built with a page builder
Step 5: Build A Services Page So People Know What You Do
Now that you’ve got people hooked with your homepage and portfolio, it’s time to tell them what you can actually do for them on your Services page. Again, if you’re not planning to offer specific services, you might not need this page.
But if you do want to offer services, clearly outlining them is a great way to let potential clients know exactly what they can expect.
Not to beat a dead horse, but once again, the best way to build this type of page is with a page builder.

Another example of how you can use a page builder
Step 6: Add A Contact Form So People Can Get In Touch
Building a personal brand isn’t much use if people can’t get in touch with you. Once you build out the pages that will do the heavy lifting for your brand, you should add a Contact page so that your visitors can send you messages.
You can find a ton of different contact form plugins, but I’m partial to WPForms because it offers both free and premium versions and has solid functionality:

An example of a contact page built with WPForms
Step 7: Blog To Establish Authority And Generate Traffic
If you want to build a personal brand, blogging is essential for two reasons:
- It helps you get more visitors to your site.
- It boosts your perceived authority and builds trust with your visitors.
Because WordPress started as a blogging platform, it’s easy to get started blogging with WordPress.
Just go to Posts → Add New and start writing about whatever it is your brand is built on!

While it might be tempting to start posting whatever random thoughts you have, I recommend that you stick to targeted content that fits your desired brand.
Step 8: Create An Email List To Connect With Readers After They Leave Your Site
Finally, if you want to create a connection with your visitors that goes beyond your website, building an email list is one of the best ways to do that.
How do you build an email list on WordPress? You guessed it – with plugins! And as luck would have it, we’ve previously written about some of the best WordPress list building plugins.
Pick one, install it, and you’re ready to start building an email list!
Wrapping Things Up
And that wraps up our guide on how to build a personal brand using WordPress.
In the end, it’s mostly about using the right WordPress themes and plugins to build out the basic pages that are necessary for your brand.
A good personal brand WordPress theme will get you most of the way there. After that, a WordPress page builder, possibly combined with a contact form plugin and a list building plugin, can help round out the rest of the functionality you’ll need for your personal branding website.
]]>To help with that part, we’re going to give you a detailed guide to WordPress Multisite. We’ll cover what WordPress Multisite is, when it’s a good idea to use, and how you can actually install and configure your own WordPress Multisite setup.
There’s a lot of ground to cover so let’s get started right away!
What Is WordPress Multisite?
WordPress Multisite is a core WordPress feature that allows you to create a network of connected sites using WordPress. If you’re familiar with the concept behind WordPress.com, you should have a pretty good idea of how WordPress Multisite functions.
It originally started as a separate project called WordPress MU (short for WordPress Multiuser), but was eventually merged into the core WordPress software in WordPress 3.0.
While it is part of the core, it’s not active by default for new WordPress installations. Instead, you have to complete a few steps to actually activate and install WordPress Multisite (more on what those are in a second!).
What Does WordPress Multisite Let You Do?
Ok, we already told you that WordPress Multisite lets you create a network of connected sites. But how does that actually function?
Here are some specific features to illustrate what that actually means:
- You or your users can create new network sites as either subdomains or subfolders
- Sites on your network are able to share the same plugins and themes.
- The various sites share the same database
How Is WordPress Multisite Different Than Regular WordPress?
For the most part, WordPress Multisite uses the same interface that you’re already familiar with. But as part of creating a network, it does make some tweaks:
- You get a new Super Administrator role that has access to a Network Admin dashboard where the Super Admin can manage network-wide settings, themes, and plugins.
- Themes and plugins function differently. Instead of each site being able to install its own themes and plugins, the Super Administrator adds them in the Network Admin section. Then, depending on your settings, individual site administrators can activate or deactivate those plugins as desired.
When Should You Use WordPress Multisite?
WordPress Multisite is a cool tool, but it’s not the right solution for every situation.
Here’s when using WordPress Multisite IS a good idea:
- You want to let third-party users create their own sites on your network. This could be a public community or a situation like where a University allows its students to create their own blogs using WordPress.
- You have multiple, similar locations/groups that need websites with similar functionality. E.g. you could use Multisite to give each franchise location its own unique website, or each sports team in a league its own website.
You’ll also find some developers who advocate using WordPress Multisite as a tool to help you manage multiple disparate sites. While this technically does work, it’s a risky approach from a security perspective. Here’s why:
All the sites on your Multisite network share the same database. As a result, they’re all still connected in a single installation.
That means every site you put into your Multisite network has a single point of failure. If you’re working with client sites – that’s a risky approach.
How To Install And Activate WordPress Multisite
You can install WordPress Multisite on both an existing WordPress single site installation or a fresh installation. Regardless of whether it’s a new or fresh WordPress install, when you activate WordPress Multisite your existing single site will become the first site on your new network.
All you’ll need to activate WordPress Multisite is:
- An existing WordPress install – either a brand new install or an existing site
- Access to edit your wp-config.php file and .htaccess file. You can either edit these files using an FTP program or cPanel File Manager. We’ll use cPanel File Manager for our example screenshots.
Once you have those two things, you’re ready to get started!
Step 1: Add Code Snippet To wp-config.php
To get started, add the following code snippet to your wp-config.php file:
/* Enables WordPress Multisite */

define( 'WP_ALLOW_MULTISITE', true );
To make things simple, you should add this code snippet directly above the line for :
/* That’s all, stop editing! Happy blogging. */

Step 2: Follow Network Setup Steps in WordPress Dashboard
Once you save the changes to your wp-config.php file, head back to the WordPress dashboard for your site.
In your WordPress dashboard, go to Tools → Network Setup to set up your new Multisite network.
Right away, you’ll need to make an important, and permanent, decision. Do you want to use subdomains or subfolders for your network sites?
- Subdomains – each site gets its own subdomain like site2.mainsite.com
- Subfolders – each site gets a subfolder like mainsite.com/site2

There’s no right answer – the decision is entirely up to your preference. Just be aware that if you choose the Subdomains function, you’ll also need to create a wildcard DNS record in order for it to function properly.
Once you make your decision, finish out the process by:
- Giving your network a Network Title – don’t worry, you can always change this later.
- Setting a Network Admin Email address.
- Clicking Install
Step 3: Add Two More Code Snippets To Your SIte’s FIles
Once you click Install, WordPress should show you a screen with two additional code snippets that you’ll need to add to your wp-config.php and .htaccess file, respectively:

Go back to your FTP program or cPanel File Manager and add each code snippet to its respective file. Note that for the .htaccess code snippet, you should completely replace the existing WordPress code, rather than simply add the new snippet.
Once you save your changes – your Multisite network is live!
How to Configure WordPress Multisite
Once you activate WordPress Multisite, your journey isn’t quite done.
Next up – you need to actually configure your new network. You can access your network’s settings by hovering over the My Sites option and choosing the Network Admin option:

Inside the Network admin area, you’ll see a familiar interface, but with a number of new options:

Here’s what the various tabs do…
Sites Tab – Manage And Add New Network Sites
In the Sites tab, you can manage all of the current sites on your network as well as manually add new sites to it:

Users Tab – Manage All The Users On Your Network
In the Users tab, you can see all of the registered users on your network, as well as which sites each user is associated with. Depending on whether or not you allow public registration, this area may or may not be helpful:

Themes Tab – Manage Available Themes For Your Network
The Themes tab is where things start getting interested. Here, you can install and enable/disable individual themes on your Multisite network.
When you install and enable a theme, you’re simply making it available to individual site admins to use. You’re not necessarily forcing them to use it.
The actual interface for adding themes is identical to WordPress single site:

Plugins Tab – Manage Plugins On Your Network
The Plugins tab is similar to the Themes tab, but with one small tweak. You can actually force your network sites to use specific plugins.
If you Network Activate a plugin, it will be active for all sites on your network. On the other hand, if you install a plugin but don’t Network Activate it, individual site admins may or may not be able manually activate it depending on how your configure your network in the Settings options.

Speaking of…
Settings Tab – Configure Miscellaneous Settings For Your Network
Finally, in the Settings tab, you can configure a bunch of additional options for how your network functions.
You have a ton of options and most are fairly self-explanatory, so we won’t cover every single option.

But here are some options you might want to pay specific attention to:
- Allow new registrations – decide whether or not you want to allow people to register and/or create their own network site.
- New Site Settings – configure the default emails/content for new sub sites.
- Enable administration menus – when checked, this lets individual site admins do things like manually enable specific plugins (though they won’t be able to deactivate a plugin that you’ve Network Activated.
Enjoy Your New WordPress Multisite Network
At this point, you should have a fully functioning and configured WordPress Multisite network. Depending on your settings, you’ll either be the sole owner of your network, or you might have individuals creating new network subsites.
No matter what, we wish you the best of luck with your new site and please leave a comment if you have any questions about WordPress Multisite!
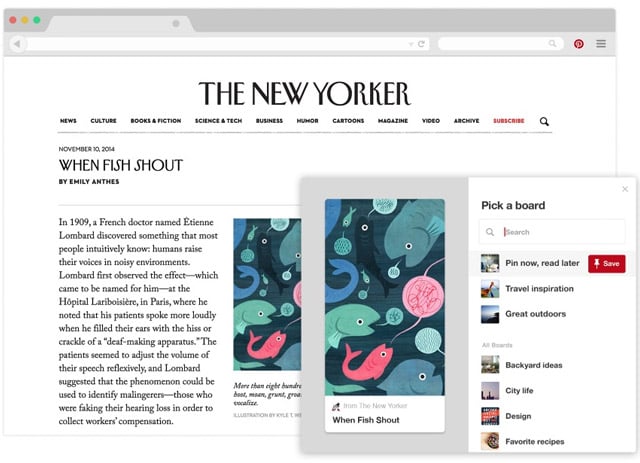
]]>That could be something as simple as a Pin-it or Follow button, or it could be embedding Pinterest boards on your WordPress site – there are lots of easy ways you can implement to extend your reach on to the Pinterest website. No matter how you’re looking to work with Pinterest and WordPress, we believe this guide can help you out.

By the end, you’ll know a variety of different ways in which you can integrate Pinterest into your WordPress site using both free plugins and manual code integrations.
There’s a lot to cover, so let’s jump right in.
The Types Of WordPress Sites That Benefit Most From Integrating With Pinterest
While many types of websites can benefit from Pinterest, there are some niches that fare better than others.
According to an actual scientific study from researchers at the University of Minnesota and Georgia Tech, these are the topics that are the most popular on Pinterest:
- Food and drink
- Crafts
- Home decor
- Women’s fashion
And while women are still the dominant demographic on Pinterest, more and more men are joining the social network. And, according to the same study, men are more interested in:
- Photography
- Art
- Design
- Home decor
So, if your site falls into those categories, you should definitely consider integrating with Pinterest. And even if you don’t, you can still probably generate at least some traffic from those 200 million plus users.
What Are Some Common Ways To Integrate WordPress With Pinterest?
Logically, there are two ways to go about integrating Pinterest and WordPress.
You can go from WordPress to Pinterest. That is, you can implement integrations that help your WordPress content get shared more often and more prominently on Pinterest. we’re talking about tactics like:
- Pin-it buttons
- Follow buttons
- Custom share images for Pinterest
Or, you can go the other way and bring Pinterest content onto your WordPress by embedding specific Pinterest boards’ feeds on your WordPress site.
In this guide to WordPress and Pinterest, we’ll cover both approaches by going through a variety of ways in which you can connect WordPress and Pinterest.
We’ll start by detailing some user friendly plugins. Then, we’ll give you the slightly-less-user-friendly manual code method that you can use to implement many of the same things without the need for a plugin.
4 Plugins to Help You Integrate Pinterest With WordPress
Below, we’ll show you four different ways that you can integrate Pinterest into your WordPress sites using plugins. For the first three methods, you can get by using entirely free plugins – so you won’t need to spend a dime for most of these integrations!
1. How To Add A Pinterest Pin-it Button to WordPress
One of the simplest ways you can encourage people to share your posts is via a dedicated Pinterest Pin-it button.
You can add these buttons in two ways:
- One general button that pins your entire post to Pinterest
- Pin-it buttons that appear on every single image when a user hovers their mouse over the image
We’ll show you how to add both types using the same plugin
Adding a Single Pinterest Pin-it Button
If you’re already using a dedicated social sharing plugin, you probably already have access to a Pinterest share button. So, before you continue on with this section, we encourage you to check your social share plugin (if applicable).
No matter what, if you just want to add a single button for Pinterest, you can use the free Pinterest Pin It Button On Image Hover And Post from Weblizar plugin.
Once you install and activate the plugin, go to the new Pinterest PinIt Button option in your WordPress dashboard.
At the top. Choose whether or not to show the individual Pin-it button on:
- Posts
- Pages

Then, save your changes. Your single Pinterest Pin-it button should be active now.
Adding a Pin-it Button To Each Image On Hover
If you want to show a Pin-it button whenever a user hovers over an image, you can configure that setting from the same interface. In the Pinterest PinIt Button settings, scroll down and make sure to turn on the option for Show Pin It Button On Image Hover.
Then, you can configure how that hover button looks by configuring the options for:
- Pin It Button Color (On Image Hover)
- Pin It Button Size (On Image Hover)

Make sure to save your changes. And that’s all there is to it!
2. How To Add A Pinterest Follow Me Button to WordPress
If you just want to add a simple button that lets your visitors follow you on Pinterest, you can use the free Add Pinterest Follow Button plugin from the same developer.
Once you install and activate the plugin, it gives you a new Add Pinterest Follow Button widget that you can use in any widgetized area on your site.
To access it, visit the normal widgets area by going to Appearance → Widgets. Then, drag over the widget and configure the four simple options:
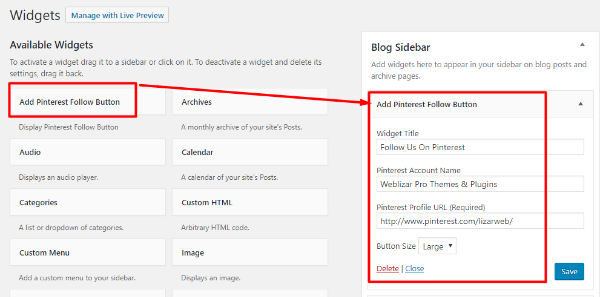
After configuration, you should see the button the front-end of your site like so:

3. How To Embed a Pinterest Board In WordPress
If you want to embed a Pinterest board in WordPress with a plugin, you can use the free AccessPress Pinterest plugin.
Once you activate the plugin, you can start embedding Pinterest boards via:
- A widget
- A shortcode
To access the widget, go to Appearance → Widgets, drag over the AccessPress Pinterest Board widget, and enter the Board URL:

To use the shortcode, go to AccessPress Pinterest → How To Use and scroll down to the Shortcode Help section. Follow the instructions for the Board Widget shortcode to create your own shortcode:

4. How To Add A Custom Pinterest Image to WordPress Posts
One unique thing about Pinterest in comparison to other social networks is that images that are taller than they are wide actually get pinned more often.
In fact, Pinterest themselves recommend a 2:3 aspect ratio for images.
But there’s a problem – WordPress featured images are usually wider than they are tall.
That means if you want to optimize your content for Pinterest, you need to include a custom image for when your post gets pinned.
Unfortunately, we couldn’t find a plugin that lets you do this for free. But if you purchase the paid version of Social Warfare, you’ll be able to specify a special Pinterest-only image for each post or page that you write.
How To Manually Add Pinterest Widgets To Your Site Without a Plugin
In all of the above examples, we showed you how to integrate Pinterest with WordPress by using free plugins.
But in addition to those plugins, Pinterest actually offers its own widget builder to help you implement many of the same functions without the need for a plugin.
With the widget builder, you can:
- Create a Pin-it button
- Add a follow button
- Embed a single Pinterest pin
- Embed an entire Pinterest board
- Display your Pinterest profile details
The only catch? You need to be able to add a short code snippet to the <head> section of your site in order for it to work.
Here’s how to use it:
First, edit the functions.php file in your child theme and add the following code snippet:
| function pinterest_code() { | |
| ?> | |
| //assets.pinterest.com/js/pinit.js | |
| <?php | |
| } | |
| add_action('wp_head', 'pinterest_code'); |
Then, you can use the official Pinterest Widget builder to create a variety of different Pinterest embeds. Once you choose your desired settings, all you need to do is copy and paste the code that Pinterest gives you into the Text tab where you want the widget to appear:

For example, you could paste the following code snippet into the text tab of the WordPress Editor (or a HTML widget):

Then, you’d see your embedded board on the front-end:

Wrapping Things Up
And that wraps up our guide on how to integrate Pinterest with WordPress.
If you’re running a WordPress site in one of the niches that do well on Pinterest, you should absolutely implement some of these methods to start boosting your traffic from Pinterest’s 200 million + users.
And even if your website isn’t in one of the hot niches, there are likely still people on Pinterest who are interested in what you have to share!
If you’re not very code savvy, the easiest solution is to use some of the plugins that we outlined in the guide. But if you do feel comfortable with some basic coding principles, you can use the manual widget builder to achieve much the same effect.
Now get out there and start getting pinned more!
]]>So let’s change that! In this post, you’ll learn a few different ways that you can embed Google Maps content into WordPress. We’ll start with the basics – embedding a single map. Then, we’ll build up to how to embed maps with multiple location markers via both manual and plugin methods.
How to Embed a Single Google Maps Location In WordPress
Let’s start with the most basic way to show a Google Maps location on your WordPress site. If you just want to embed a map with a single location or view, you don’t need any fancy tools or plugins – all you need is to paste the Google Maps embed code into your WordPress site.
Here’s how it all works:
Go to the Google Maps website like normal and search for the location that you want to embed. You can search for anything. That is:
- An entire country
- A specific city
- A specific business
- You name it
It doesn’t really matter!
Once you have the location that you want to show on your map, look for the Share button in the left sidebar:

You should see a small popup appear. Click the Embed map option in that popup:

Then, choose your desired size from the drop-down. And once you’ve selected the size that you want, copy the code in the box:

Now, head to the WordPress post or page where you want to embed the Google Maps box.
In the WordPress Editor, toggle over to the Text tab and paste the code that you copied from Google Maps at the spot where you want your map to appear:

Now, publish your post like normal and you should see your Google Maps box on the front-end of your WordPress site:

Easy enough, right?
You can also use a similar method to embed Google Maps directions in WordPress. The only difference is the starting interface. Instead of seeing the Share button right away, you’ll need to click the hamburger icon and choose the Share or embed map option:

How to Embed Google Maps With Multiple Location Markers Into WordPress
If you want to embed a Google Maps box with multiple location markers into WordPress, things are a little bit different.
While I will show you two Google Maps WordPress plugins to help you accomplish this in the next section, you don’t actually need a plugin to do it.
Instead, you can create your own map using Google My Maps and then embed that map in WordPress using a similar method to the one outlined above.
To get started, head to Google My Maps and click Get Started to launch the interface. In the interface, click the option to Create a New Map:

Then, use the interface to build your map. It can be a little tricky to get started – but once you get the hang of things, it’s pretty easy to use. You can search for things by using the search box, and you can add markers on the map using the Marker button:

Once you’re happy with your map, click on the Three Dot icon at the top and select Embed on my site.

Then, just like before, you can paste the code that Google Maps gives you into the Text tab of the WordPress Editor to display the map on your WordPress site.
WordPress Plugins To Help You Work With Google Maps Even More
While you don’t really need a plugin to handle basic Google Maps embedding like I showed you above, plugins can come in handy if you want more flexibility (or if you want a more user friendly way to implement that flexibility).
Most plugins don’t really do anything that you couldn’t do by yourself with enough elbow grease – but they do make it a heckuva lot easier and more user friendly. Here are some neat plugins to help you work better with Google Maps.
WP Google Maps
WP Google Maps is the most popular free Google Maps plugin at the WordPress.org plugin directory.
It helps you create your own custom Google Maps displays using map markers that you choose and different map themes. Basically, it’s a more user friendly implementation of the process that I just outlined above.
The only downside is that the free version only lets you create a single map. If you need multiple maps, you’ll need to either purchase the premium version or use a different solution.
To get started, install and activate WP Google Maps. Because it’s listed at WordPress.org, you can do that directly from your WordPress dashboard.
Once you activate it, go to the new Maps option in your sidebar to get started.
Before you can create your first map, though, you’ll need to obtain a Google Maps JavaScript API Key and enter it in the plugin’s settings. You can do that by following these instructions:

Once you enter your API key, you can edit the default My first map (remember – the free version of this plugin only lets you create one map):

Use the interface to build your map. Then, when you’re finished, you can embed it anywhere on your site using the shortcode:

It’s super easy and flexible – the only downside is the one map limitation in the free version.
Maps Builder
Another good option for creating Google Maps embeds with a WordPress plugin is Maps Builder.
Once you install and activate the plugin, you’ll get a new Google Maps tab in your dashboard sidebar. As with WP Google Maps, you’ll need to add a Google Maps API Key before you can get started with the plugin.
Once you do that, you can go to Google Maps → Add New to build a new map. In that interface, click the Open Map Builder button to launch the user friendly interface:

There, you can build your map using the plugin’s sidebar:

Once you’re finished, you can use the shortcode created by the plugin to embed the map anywhere on your WordPress site.
WP Store Locator
If you specifically want to use Google Maps to display multiple store locations on your WordPress site (a common desire!), you might be better off using a dedicated store locator plugin.
While you can find several plugins to do this, I like WP Store Locator because it’s flexible and looks great.
Use Your Favorite Page Builder’s Google Maps Module
Most WordPress page builders include a dedicated Google Maps element/module to help you embed Google Maps content in your designs.
For example, the popular Divi Builder plugin includes a Google Maps module that you can customize a fair bit via the plugin’s interface:

So if you’re already using a page builder, check to see if your page builder has a Google Maps tool before you go running off to find a dedicated Google Maps plugin,
A Fun Tweak For Advanced Users
This method is advanced and requires code knowledge – so if you’re a beginner, feel free to ignore this.
But if you know your way around WordPress and custom fields, you can use a custom field to automatically create a map based on the Google Maps Map URLs scheme.
For example, you can create a field on the WordPress backend where a user just needs to paste in the address to a location.
Then, with a little pre-processing to remove spaces, you can insert that address into something like below in an iframe in your theme’s template files:
And voila! All a user needs to do is enter an address in the WordPress Editor and a Google Maps embed will automatically appear on the front-end for that location.
Again – this method definitely requires a basic knowledge of PHP and custom fields – but it is a cool hack to save some time.
Wrapping Things Up
Whether you just want to do something basic like embed a regular Google Maps location into WordPress or get more advanced with multiple map markers or automatic map creation, you have plenty of options.
For embedding single maps, you can probably skip the plugins and just use the regular Google Maps embed code. But if you want to create maps with multiple locations and have easy control over styling, the two Google Maps plugins are good options.
And finally, if you’re using a page builder, you should definitely check to see if you already have a Google Maps element before you turn to an external solution.
]]>Luckily, speed up your website can be done with a few small tweaks which should be in reach of most people’s technical abilities. After picking fast web hosting, which is probably the number one way to improve your site speed there are a number of other things you can do, one such thing is by employing the use of a Content Delivery Network ( CDN ).
If you want to speed up your WordPress site while reducing the load on your own web server, a content delivery network, or CDN for short, is one of the best ways to do that. In this guide, we’ll tell you everything you need to know about content delivery networks, including how to add a CDN to WordPress for free with a service called Cloudflare.
If you’re interested in making a massive improvement to your WordPress site’s page load times, keep on reading!
How Does a Content Delivery Network Work?
Usually, whenever someone visits your website, they have to download all of your website’s files (HTML, images, text, etc.) from your web server.
You might not know it – but your website is usually stored on a specific server in a physical data center located in some city around the world.
For example, if you host your site in Dallas, Texas, that means everyone who visits your site has to download your site’s files from Dallas, Texas.
Now, that’s fine if your visitor is located in nearby Austin, Texas.
But what if your visitor is in London? Sure, the Internet moves incredibly fast, but it’s still limited by the laws of physics. That is, it’s going to take your site a tiny bit longer to load for the London visitor than for the Austin visitor.
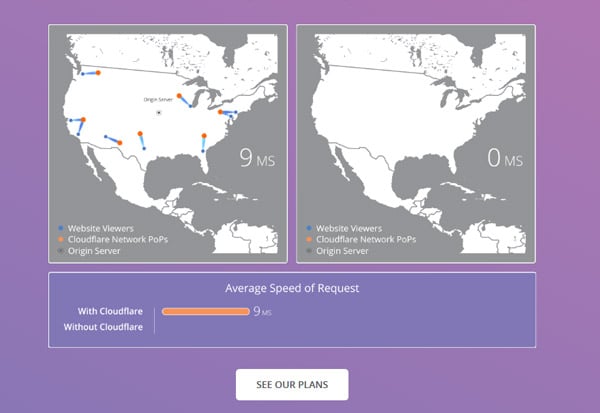
So how does a content delivery network tie in?
A content delivery network stores copies of your site’s files on different servers all around the world. That way, visitors from anywhere in the world can download your site from the nearest content delivery node, instead of needing to get it from your actual server.
What Are The Benefits of a CDN?
Ok, so that’s the major benefit of a CDN:
Speed.
Because your visitors can download your site from the nearest content delivery server, it just plain takes your site less time to load.
Beyond page load time improvements, though, content delivery networks also offer a few other benefits:
- Less work for your server. Because content delivery network nodes serve your content, your actual server has to do less work.
- Security. Many CDNs provide protection against attacks such as DDoS attacks.
Next up, we’ll get into actually showing you how to add a CDN to WordPress using Cloudflare.
Cloudflare: What We’ll Be Using For This Guide
For this guide, we’re going to use a free CDN service called Cloudflare.
We like Cloudflare because, in addition to being free, it:
- Is one of the easiest CDNs to set up for WordPress
- Offers a web application firewall, DDoS protection, and client side SSL (this isn’t the best SSL, but it’s better than nothing)
Here’s how to add a CDN to WordPress using the free Cloudflare plan.
How to Add a CDN to WordPress With Cloudflare
We’ll cover each step in detail, but here’s a high-level look at what you need to do to get set up with Cloudflare and WordPress.
- Create a free Cloudflare account
- Add your website to Cloudflare
- Change your domain nameservers to point to the Cloudflare nameservers
- Install and activate the official Cloudflare plugin to finish configuration
Nothing too complicated! Even if you don’t know any code, you’ll be able to follow this guide.
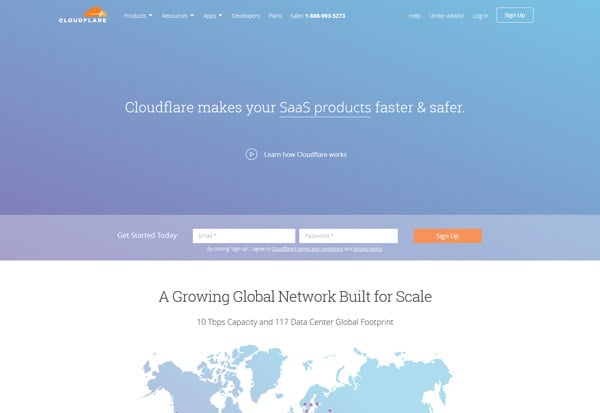
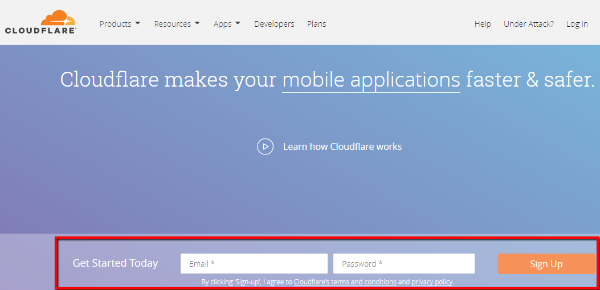
Step 1: Sign Up for Cloudflare
To get started, head to Cloudflare, enter your details, and click the Sign Up button:
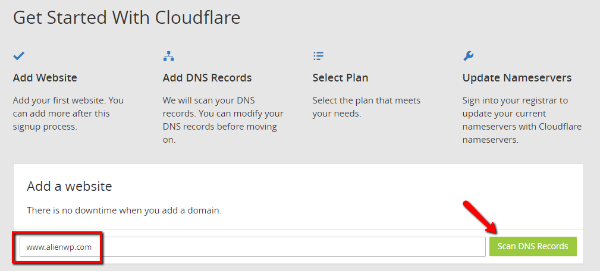
Step 2: Add Your Website to Cloudflare
Once you create a Cloudflare account, you should see a Get Started With Cloudflare interface.
In the first step, all you need to do is enter your domain name and click Scan DNS Records:
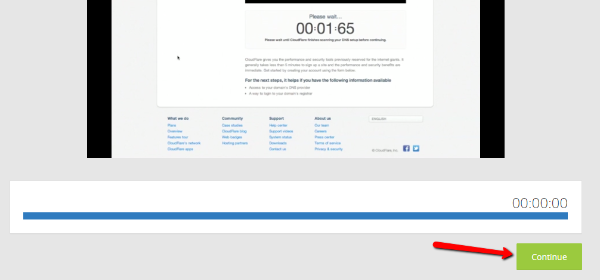
Once you click the button, Cloudflare will show you a short video while it scans your website’s DNS servers.
You can watch the video for a basic understanding of how Cloudflare works. Then, once the process finishes, click Continue to move on to the next step:
Step 3: Verify Your DNS Records
Ok, this step might look super confusing if you don’t know what’s going on. Don’t panic – it’s really not complicated.
If you know about DNS, you can make some changes here to tweak how Cloudflare works.
But if you have no idea what’s happening, I’m going to show you a neat little trick.
All you need to do is verify that the icon next to your actual domain name is Orange instead of Grey:
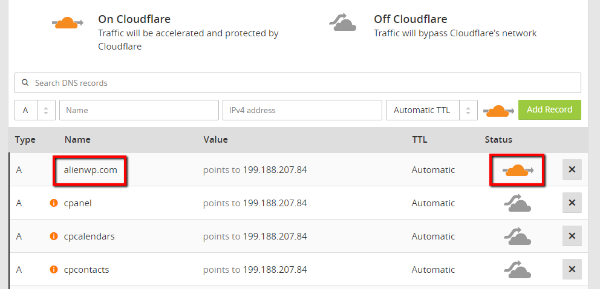
Don’t worry about the other stuff if you’re confused. Just verify that you see that orange icon next to your primary domain and click Continue at the bottom.
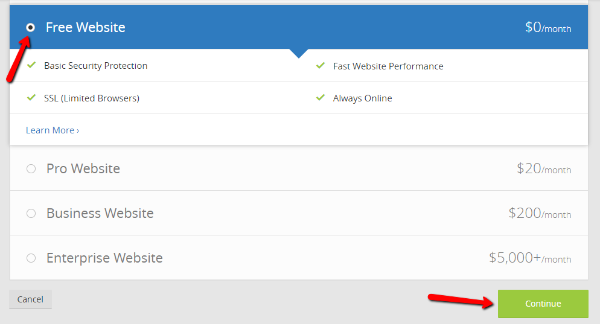
Step 4: Select a Cloudflare Plan
At this point, Cloudflare is going to try to upsell you on one of its paid plans. Don’t worry, though. You don’t need to pay.
For the vast majority of websites, using the free Cloudflare plan is totally fine.
Just select the Free Website option and click Continue:
Step 5: Change Your Nameservers to Cloudflare
Cloudflare functions by routing all of the traffic to your site through its own nameservers. For that reason, you need to change your domain’s nameservers to point towards Cloudflare in order to use the service.
On this page, Cloudflare gives you the nameservers that you need to use:
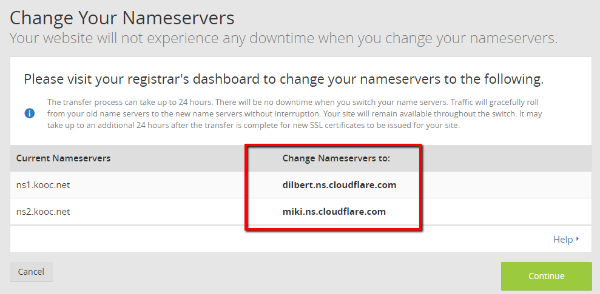
At this point, you need to go to the place where you registered your domain name and change your nameservers from the Current Nameservers values to the Change Nameservers to: values.
Usually, you’ll do this either at your web host or a third-party register like GoDaddy or Namecheap. Here are instructions for popular places where you might have registered your domain:
If you registered your domain name somewhere else, you should be able to find instructions by Googling – [place where you registered domain name] + change nameservers.
Once you change your nameservers, you might need to wait up to 24 hours for the changes to take effect. Your site shouldn’t experience any downtime, though.
Once you’ve made the change, go back to Cloudflare and click Continue.
And that’s it! Your CDN is up and running. There’s just one more optional step that directly syncs Cloudflare with your WordPress site.
Step 6: (Optional) Install and Configure Cloudflare Plugin
The official Cloudflare plugin is an optional add-on that lets you control Cloudflare settings from inside your WordPress dashboard. Beyond bringing the settings panel into WordPress, it also helps to make some configuration changes that help specific Cloudflare features work better.
To set it up, first install and activate the Cloudflare plugin. Then, go to Settings → Cloudflare to configure it.
There, click the button to sign in:

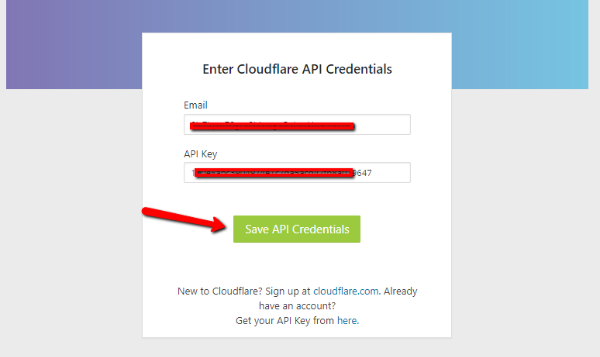
On the sign in page, you’ll need to enter:
- Email – the same email you used to sign up for Cloudflare
- API Key – you can find this inside your Cloudflare account by going to My Profile (available by clicking the drop-down in the top right) and looking for the Global API Key option
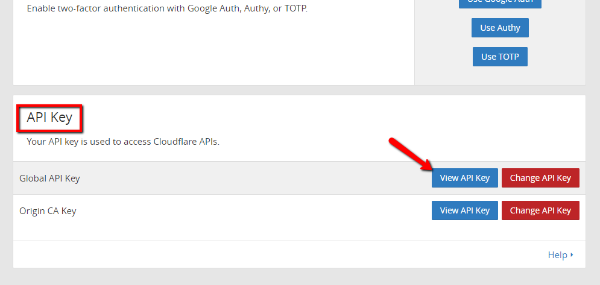
Then, click Save API Credentials.
And that’s it! Now, you can configure your Cloudflare settings right from your WordPress dashboard.
Other Popular CDN Services for WordPress
While we used Cloudflare for this guide, it’s definitely not the only CDN that works well for WordPress.
Additionally, some people don’t like using Cloudflare because it requires you to point your nameservers to Cloudflare (Cloudflare is a huge company so there’s not a major risk, but it does require you to give up control).
If you’d like some other CDN options for WordPress, these two are both good solutions:
- StackPath – formerly MaxCDN, StackPath is a popular option with WordPress webmasters.
- KeyCDN – KeyCDN is a popular, and affordable, content delivery network with a plugin called CDN Enabler that makes it easy to add a CDN to WordPress.
The setup process for both of those CDNs is a tiny bit more complicated, but each has a wealth of documentation that shows you how to complete the setup process.
Wrapping Things Up
CDNs are a great way to improve your site’s page load times, make it more resistant to traffic spikes and DDoS attacks, and take a load off your server.
Cloudflare makes it remarkably simple to add a CDN to WordPress, which is why we chose to use it for our guide.
With that being said, don’t feel like you have to use Cloudflare for your WordPress site. There are other content delivery networks like StackPath and KeyCDN that also offer easy-to-implement solutions for WordPress.
We hope you enjoyed our guide on how to add a CDN to WordPress and please let us know if you have any further questions.
]]>In this post, we’ll give you a detailed guide to the WordPress admin dashboard, covering every single menu option that’s available to you. By the end, you should know everything there is to know about the WordPress admin dashboard.
Let’s get started!
How to Access Your WordPress Admin Dashboard
Let’s start at the beginning:
How to actually access your WordPress admin dashboard. By default, you can always access the WordPress dashboard by appending “wp-admin” to the end of your main WordPress URL.
Most of the time, this means that you can access your dashboard at:
yourdomain.com/wp-admin
With that being said, if you installed WordPress in a subfolder of your main domain name (like “yourdomain.com/wordpress”), you’ll need to append “/wp-admin” to that specific folder to access your dashboard.
When you access that URL, you’ll see your dashboard summary screen (though you might need to log in to your WordPress install before you can see it).
Your WordPress admin dashboard has a number of parts, all accessible by the menu options on the left-hand side of your screen:
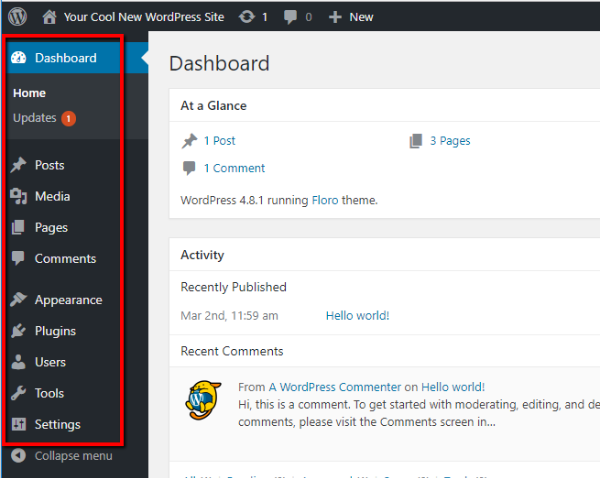
Let’s go through what each section lets you do…
A Look At Your Dashboard Summary Screen
By default, the main dashboard area shows you a broad overview of your site and its activity, as well as some information about upcoming WordPress events and news:
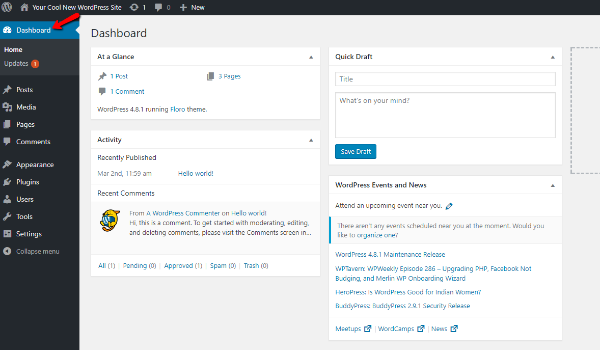
Honestly, you probably won’t spend that much time in this interface. Instead, you’ll spend most of your time using more specialized parts of your WordPress admin dashboard.
Still, this overall look is helpful for seeing things “at a glance”, and some plugins will add helpful “widgets” to this screen.
One area that is especially important is the Updates submenu. If you need to update your WordPress software, plugins, or themes, a red number will pop up indicating how many updates you need to perform:
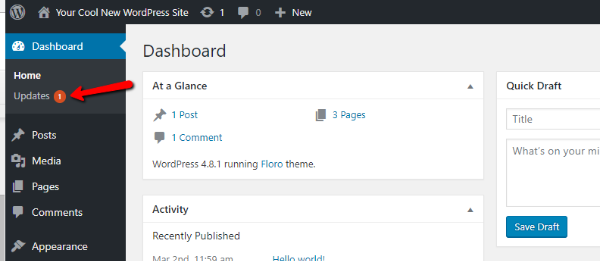
To automatically update your site, you can click on the Updates link and run updates directly from that dashboard area:

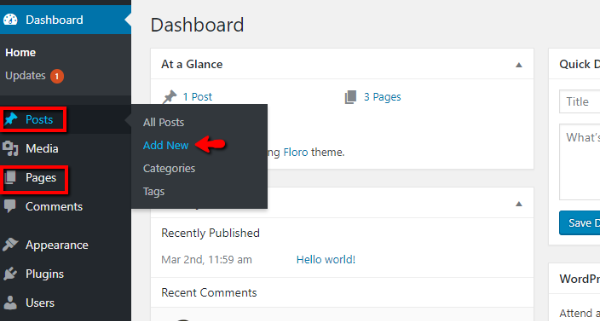
Creating and Managing Posts and Pages
Moving on from the main dashboard area, let’s get to the core functionality of most WordPress sites:
- Posts and pages
These two types of content are the default ways in which you can create content for your site. Posts are best for blog post style content, while pages are better for more static content.
To create a new post or page, all you need to do is go to Posts → Add New or Pages → Add New:
Then, you’ll be in what’s called the WordPress Editor.
How the WordPress Editor Works
The WordPress Editor is where you can actually enter the text content for your post or page, add images, choose categories, and more.
The main editor area is something called WYSIWYG (what you see is what you get). That means it functions similarly to how most word processing programs work.
For example, if you want to make text bold, you just hit the B button, type your text, and you’ll see bold text:

You can use the other buttons to add even more formatting.
To add images, you can use the Add Media button. And whenever you’re ready to publish your post or page, all you need to do is hit the Publish button.
Managing Your Posts and Pages
Once you publish some posts or pages, you can manage them by clicking on either the main Posts or Pages menu options:
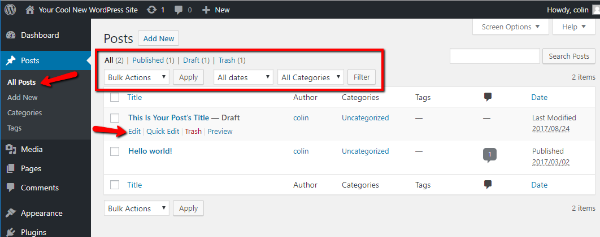
If you hover over a specific post or page, you can quickly access a variety of helpful options. And you can also filter and apply bulk actions to your posts by using the drop-downs at the top of the interface.
These filters might not be especially helpful when your site is brand new. But as your site grows in popularity, they’ll definitely come in handy.
Managing “Media” Aka Images, Videos, and More
In the Media tab, you can manage the images and other media files that you upload to your WordPress site:
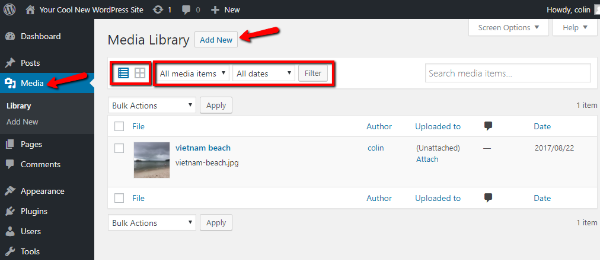
You can switch between different views by toggling the icons. And you can also sort and filter using the drop-downs.
You’re unlikely to use this area of the WordPress admin dashboard very often. But it does come in handy for specific situations, like when you want to delete a certain media file from your site.
You can also add new media files by clicking Add New. But, it’s usually simpler to upload images through the WordPress Editor interface when you’re creating a post or page.
Managing Comments From Your Visitors
In the Comments menu, you can manage comments from your visitors. This tab is especially important because, at least by default, your visitors’ comments won’t show up on the front-end of your site until you manually approve the comments.
You can change this setting in the Settings area (more on that later!), but by default, a user’s first comment always requires manual moderation.
For each comment, you can hover over it to mark it as:
- Approved
- Spam
- Trash
And you can also quickly edit or reply to a comment from the same menu:

Changing How Your Theme Looks And Functions
Next up is the Appearance area. It’s a meaty section of your WordPress dashboard, so it requires a bit of a deeper look than the previous sections.
The Appearance section of your WordPress admin dashboard helps you change everything from:
- What WordPress theme your site uses
- Basic theme styling – colors, layout, etc.
- Widgets – helpful little “content blocks” that add functionality to your theme, usually in its sidebar and/or footer
- Menus – the actual navigation menus used on your site
When you first click on the Appearance menu, you’ll be able to choose which theme your site uses, as well as add new themes (if desired):

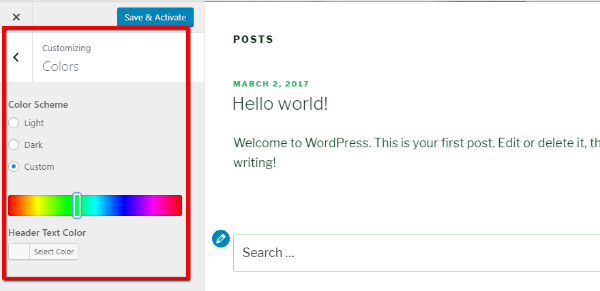
Using the WordPress Customizer
If you click on the Customize option, you’ll launch something called the WordPress Customizer.
If your theme supports it, this is a helpful interface that lets you make changes to your theme without needing to know any code. What’s even more helpful is that you can preview those changes in real-time:
Adding or Removing Widgets
In the Widgets menu, you can add or remove widgets by simply dragging and dropping them between the Available Widgets column on the left and the Sidebar column on the right:
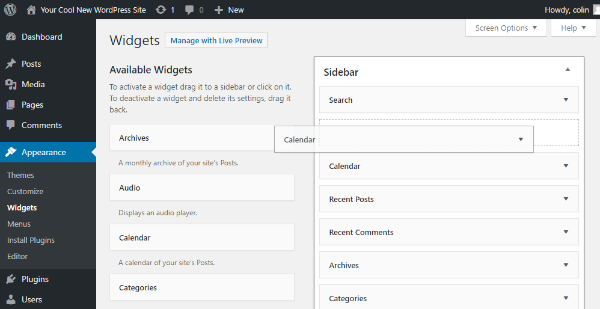
Depending on your specific theme, you might have multiple available widget areas. Each area will be marked by a title.
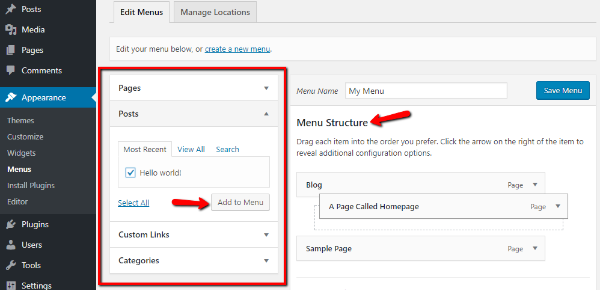
Adding or Removing Menu Items
In the Menus tab, you can add or remove links from the navigation menus used on your site. You can use the options on the left side of the screen to add new menu items. Then, you can rearrange existing menu items by dragging and dropping them:
Adding and Managing WordPress Plugins
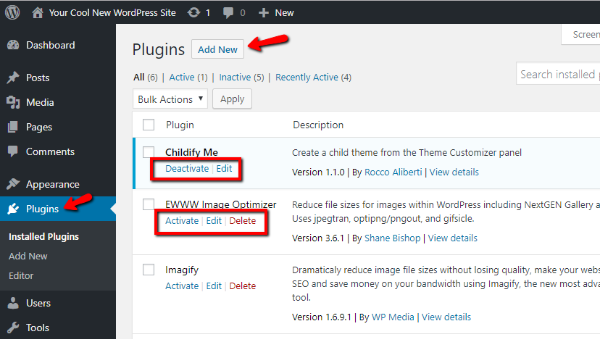
WordPress plugins help you add tons of neat functionality to your site. In the Plugins menu area, you can add new plugins and manage existing plugins.
When you first click on Plugins, you can see a list of all of the installed plugins on your site. You can also activate, deactivate, or delete each plugin from this area:
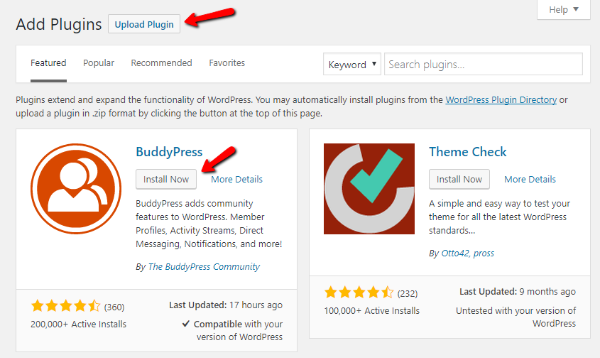
If you click on the Add New button, you can add new plugins by searching the WordPress.org plugin directory or uploading a ZIP file:
Adding and Managing Users
In the Users area, you can view and manage all of the accounts that are registered at your site. If you’re the only person with access to your site, you’re unlikely to ever use this area of the WordPress admin dashboard.
But if you’ll have other authors or contributors, this area is helpful to manage those accounts. You can click the Edit button under each user to manage more settings:

Using WordPress Tools
The Tools area is another menu option that you’re unlikely to use often (or ever). It’s mainly helpful for the ability to import or export your content, which comes in handy if you’re migrating sites.
On a day-to-day basis, though, you probably won’t use this menu option.
Accessing General WordPress Settings
Finally, we get to the last menu area – Settings.
This menu area includes a variety of important settings for your WordPress site. The settings are divided into 6 different tabs. Unfortunately, explaining how to configure each tab would require a whole post of its own.
Rather than do that, I’ll just explain what each tab allows you to do and leave the decision making up to you.
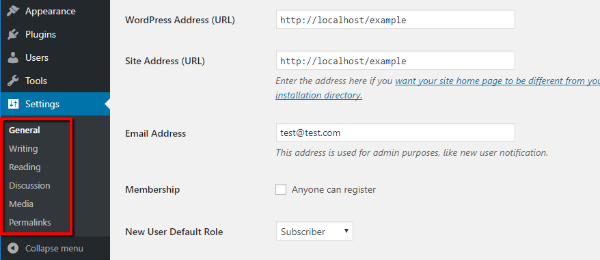
- General – basic settings like site address, time zones, language, date format
- Writing – a fairly unimportant tab that lets you set default post categories and other small settings
- Reading – helps you set a static front page and configure other options about how to display your posts and content
- Discussion – lets you configure options about commenting like whether a comment requires approval
- Media – lets you set the default image sizes used on your site
- Permalinks – VERY IMPORTANT – lets you set the URL structure for your site. We recommend Post name for the structure.
Will Your Dashboard Always Look Like This?
No, your dashboard will invariably change over time.
We gave you a tour of the default WordPress dashboard. But as you add new themes and plugins, those additions will also add new menu items to your WordPress admin dashboard.
For that reason, you’ll almost always pick up new menus and submenus as your site ages.
A Helpful Tip To Get More From The WordPress Dashboard
To wrap things up, let us leave you with one helpful tip to customize your WordPress admin dashboard to your liking.
Every menu inside the WordPress admin dashboard has a Screen Options menu in the top right corner:
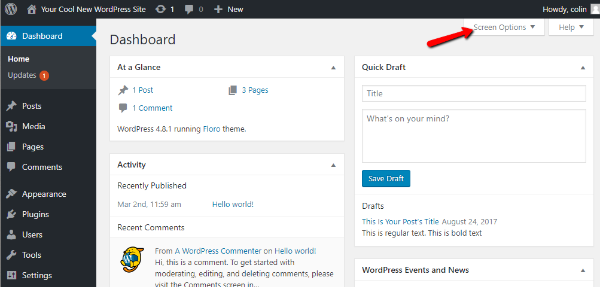
If you click this option, you’ll be able to customize how that menu area looks and functions:

As you become more attuned to how you actually use the WordPress dashboard, you can use these screen options to streamline your workflow.
We hope you found this guide to the WordPress admin dashboard helpful, and we wish you the best of luck with your WordPress website!
]]>But how can you use video on your WordPress site? Is it easy to embed videos? And just how do you actually go about doing that?
We have put together this complete guide for beginners to help you get to grips with using videos within your WordPress website. In this post you will learn how to incorporate videos from the following sources:
- YouTube videos
- Vimeo videos
- Other video sources
- Self-hosted videos
And we’ll also show you some cool plugins to make things even easier, as well as other little tricks like creating video header backgrounds and embedding videos in your sidebar. And if your site is totally dedicated to video, you might want to check out some WordPress video themes.
Let’s get going, starting with…
How to Embed Single YouTube Videos in WordPress
It’s surprisingly simple to embed a YouTube video in WordPress. Seriously, if you’ve never done it, I bet you’ll be surprised by how easy it is.
You know how YouTube gives you the embed code on each video’s page? Yeah, forget about that.
You don’t need it!
Instead, all you need is the actual URL of the video that you want to embed. Once you have the URL, all you do is paste it into the Visual tab of the WordPress Editor like this:

Almost instantaneously, WordPress will automatically convert the raw YouTube link into an embed:

It doesn’t get much simpler than that! The only thing to remember is to make sure that you’re in the Visual tab of the WordPress Editor. This method won’t work in the Text tab.
Another way to embed a YouTube video from its URL is to click the Add Media button and select Insert from URL. Then, just paste in the YouTube link and click Insert into Post:

How to Embed Playlists or More Advanced Single Videos
While the basic WordPress YouTube embed functionality is fine most of the time, you’ll definitely run into situations where you want a little bit more control over how you embed YouTube videos on WordPress.
For example, the basic YouTube embed function doesn’t let you easily resize the dimensions of your embedded videos. Similarly, it only works for single videos, which isn’t much help if you want to embed a YouTube playlist or something.
In those situations, your best bet is to turn to a third-party YouTube plugin for help. There are a bunch of free and premium options out there, but a good starting point is the creatively named (sic) YouTube Embed plugin.
Here’s some of what the plugin can do:
- Embed a gallery of YouTube videos
- Continuous play and/or autoplay
- Automatic live stream embeds
- Responsive design sizes
- Lots of other smaller features
Here’s how to use the plugin:
After you install and activate YouTube Embed plugin, you’ll get a new YouTube button in the WordPress Editor interface:

Clicking on the button will open an interface that gives you a variety of different YouTube embed options:

If you click on an option, the plugin will give you specific instructions on what to do from there. For example, to embed a single video, all you need to do is paste in the URL like normal:

To configure various settings about how your embedded YouTube videos function, you can head to the YouTube Free tab in your dashboard sidebar. Some features require the Pro version of the plugin, but most are configurable in the free version:

You may also need to enter your YouTube API key to enable some embed types. The plugin can guide you through this entire process if needed.
Other Helpful WordPress YouTube Plugins
If you want to go even further with your YouTube video embeds, here are a couple of other helpful plugins:
- Yottie – a popular and affordable plugin that gives you 100+ adjustable parameters to embed your YouTube videos.
- Video Gallery – another affordable plugin that can help you create video galleries from YouTube videos, as well as other sources like Vimeo.
How to Insert a Header Hero Video from YouTube
Let’s round the YouTube section out with one feature that’s fairly new to WordPress. Assuming your theme supports it, you can now add a header background video from a YouTube video. This feature is notably available in the default Twenty Seventeen WordPress theme.
To access this feature, go to Appearance → Customize. Then, select the Header Media option. From there, all you need to do is paste in the URL to the video that you want to use as your background:

Again – not all themes support this feature. But if your theme does, it’s an easy way to create a header video background.
How to Embed Vimeo Videos in WordPress
I have good news! Embedding Vimeo videos in WordPress is just as easy as embedding YouTube videos. That is, all you need to do is grab the URL of the video that you want to embed and paste it into the WordPress Editor.
Then, you’ll see a live preview of your video:

For more control over your WordPress Vimeo videos, the free Vimeography plugin is a good option that allows you to create Vimeo video galleries on WordPress.
Beyond that, you can also change how your Vimeo gallery looks with a built-in appearance editor.
How to Embed Other Videos in WordPress
While it’s possible to embed videos from a range of sources just by pasting in a URL (you can see the full list here), that’s not the case for every single third-party video service.
If your desired video source isn’t supported, you can usually still embed it by:
- Copying that video source’s actual embed code (not the URL)
- Pasting that embed code into the Text tab of the WordPress Editor

The example above illustrates how to embed a Wistia video in WordPress.
It’s important that you use the Text tab, otherwise the embed code won’t function properly.
How to Host Your Own Videos on WordPress
Ok, you definitely can host your own videos on WordPress. But before we get to that, it’s important to lead with a discussion of whether or not you actually should self-host videos on WordPress.
See, video sites like YouTube actually handle a lot of difficult behind-the-scenes work that falls squarely on your shoulders when you opt to self-host videos with WordPress.
So…
Here’s Why You Should Think Twice Before Self-Hosting Videos on WordPress
If you’re dead set on self-hosting your videos on WordPress, we will show you how to do that in a second. But first, here are some reasons why going with a free service like YouTube or Vimeo is usually a better option:
- Server bandwidth – video files are huge. While Google has full countries of servers (slight hyperbole), your server doesn’t have quite the same transfer power, especially on shared hosting. Even if your host offers “unlimited” bandwidth, there’s a good chance they cut you off if you use too much.
- Slow video – even if you use a CDN to deliver your videos (which would help with server bandwidth), you’ll still probably never load your videos as quickly as YouTube or others.
- Different video formats and qualities – ever noticed how YouTube lets you seamlessly switch between different video qualities? If you try to self-host videos, you’ll have to do all of that converting manually. That’s a pain.
- Less visibility – did you know that YouTube is the second largest search engine in the world? When you self-host your videos, you lose access to the huge amount of searching that happens on YouTube.
So there you have it – hosting your videos on YouTube or another dedicated video provider is almost always your best option. But if you absolutely need to self-host videos on WordPress, here’s how to do it…
How to Self-Host Videos on WordPress
To self-host videos on WordPress, upload your videos via the media library or Add Media button inside the WordPress Editor.
Once uploaded, use the Insert Media interface to insert them with the Embed Media Player option:

If you want to modify the dimensions of your video, you can go to the Text tab and change the parameters for width and height:

Otherwise, you’re ready to publish your self-hosted video. Here’s a shot of what the self-hosted WordPress video player looks like on the front-end:

How to Add Videos to Your WordPress Site’s Sidebar
Finally, let’s round things out with a fairly new WordPress feature. Since WordPress 4.8, WordPress includes a Video widget by default.
This video widget lets you easily embed videos into your sidebar, footer, or any other widgetized area on your site.
To use it, head to Appearance → Widgets and drag over the Video widget. Then, you can embed videos by pasting in their URL or selecting files from your media library:

Wrapping Things Up
And that wraps up our guide on how to use video on your WordPress site.
Once again, your best option is almost always to host your videos at a third-party site like YouTube or Vimeo. Embedding videos from those sites is easy and will save you quite a bit of time and resources.
To embed single videos, you can almost always just paste in the URL to the video and WordPress will handle the rest.
To get more creative with video galleries or playlists, you’ll likely need the help of a third-party plugin, though.
We hope you enjoyed the guide, and let us know if you have any questions!
]]>
So…let’s change that. In this post, I’ll give you a detailed guide to Jetpack. You’ll learn:
- What the Jetpack plugin is
- How to install the Jetpack plugin
- How to use some of the popular Jetpack features
In More Detail…What is Jetpack for WordPress?
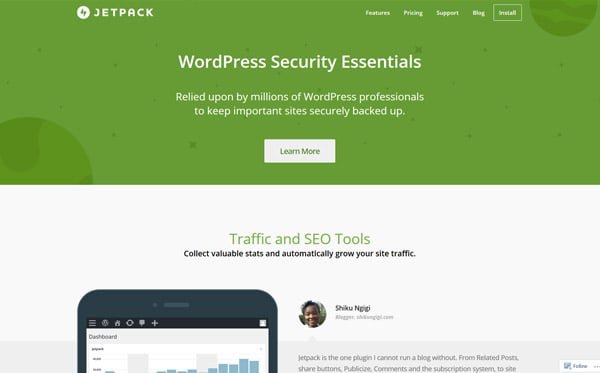
Jetpack is a massively popular plugin from Automattic, the same company behind WordPress.com. It tries to make your life significantly easier by giving self-hosted WordPress installs access to many of the same helpful features available to WordPress.com users.
In addition to connecting your self-hosted WordPress site to your WordPress.com account, it does this through a variety of individual modules that you can enable or disable at will. A module is basically a specific feature. Modules handle things like:
- Traffic stats and analytics
- Security with brute force prevention and malware scans
- Photon image CDN for faster page load times
- Backups and restores
- Contact forms
- Automatic social media promotion
- Social share buttons
- Image galleries
- Spell checking
Plus plenty of smaller features that aren’t on that list.
Some of these modules, like backups and restores, require a paid plan, but the free plan still offers plenty of helpful functionality. As I mentioned, you don’t need to use every single feature, either.
If you don’t want some of the features, you can easily disable specific modules on an individual basis (I’ll show you how to do this later on)
Guide to Jetpack: How to Install the Plugin
While the Jetpack plugin is listed at WordPress.org, the install process is a little bit more involved than some plugins you might be familiar with.
Don’t worry, though! It’s nothing too difficult. And I’ll show you how the whole thing works step-by-step.
Step 1: Install Jetpack From Your WordPress Dashboard
To get started, you need to install the Jetpack plugin. You can do this directly from your WordPress dashboard by going to Plugins → Add New and searching for Jetpack. Then click Install Now by Jetpack:
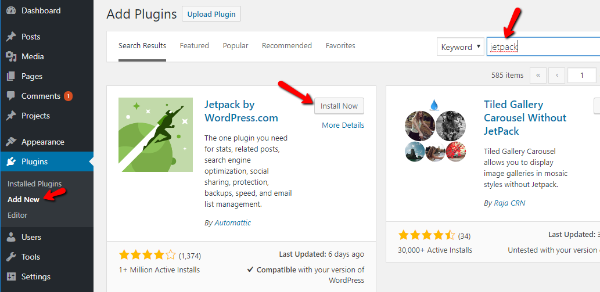
After the install process finishes, the Install Now button will change into an Activate button. Make sure to click that button in order to activate the Jetpack plugin.
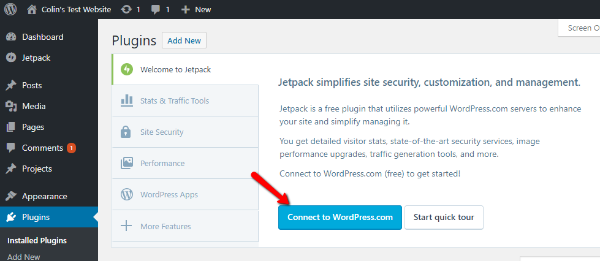
Step 2: Connect Your WordPress.com Account
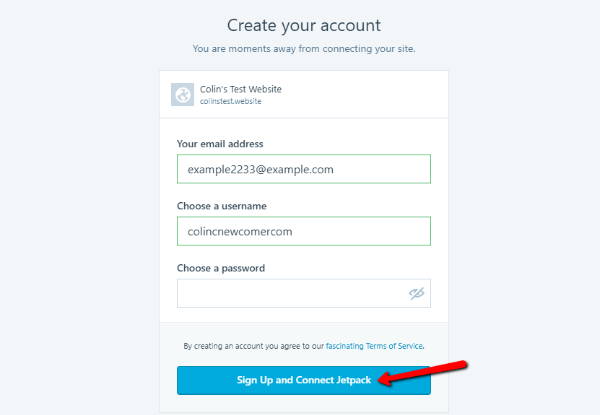
Once you activate Jetpack, you’ll see a prompt asking you to Connect to WordPress.com. Click that button to get started:
If you already have a WordPress.com account and are signed in, all you need to do is click the Approve button to connect your site.
If you don’t have a WordPress.com account, you can follow the prompts to create a new account and connect your site:
Once you connect your site, you’ll see a big pricing table. Don’t worry – you don’t need to pay any money to use Jetpack (though you will miss out on some features if you don’t pay). To avoid paying, just click the Start with Free button:
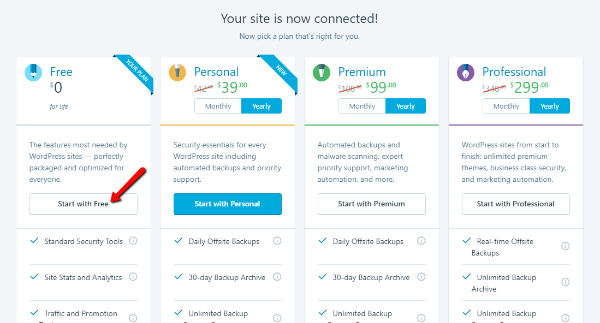
If you decide that you want those premium features later on, you can always upgrade at a later date.
Step 3: Activate Recommended Features
Once you select the free plan, Jetpack will prompt you to activate recommended features. You don’t have to do this. But I recommend it as a starting point because it enables a bunch of helpful features at once:

In the following sections, I’ll show you how you can go in and disable some individual modules if you decide that you don’t want any of these features later on.
And with that, you’re done the basic setup! Keep reading to learn how to use and enable/disable specific Jetpack modules.
Enabling Or Disabling Specific Jetpack Modules
Jetpack makes it easy to enable or disable specific modules whenever you want.
To manage the modules used on your site, go to Jetpack → Settings in your WordPress dashboard.
On the Settings page, Jetpack divides its modules into five different tabs.
To enable or disable any module, all you need to do is click the toggle button:
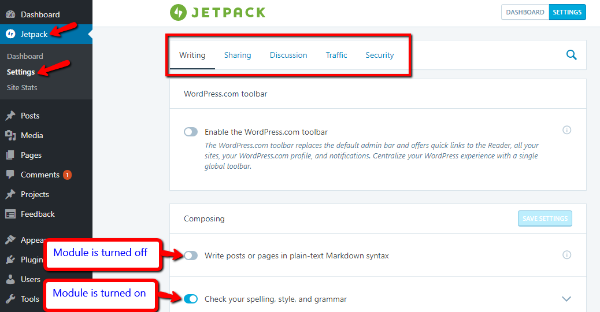
I recommend that you explore all of these different tabs because there are some small features that aren’t automatically enabled. You can hover over the “I” icon next to each feature to learn more about what it does.
How to Use Popular Jetpack Modules and Features
In this section, I’ll show you how to use some of Jetpack’s popular modules. All of these modules are available in the free plan.
I won’t show you every single module because that would take a whole textbook. But I will give you a look at the most popular modules.
How to Set Up Automatic Social Sharing
One especially helpful Jetpack module is one that lets you automatically share new posts to social media. If you activated the recommended features, Jetpack already turned this module on.
But in order to actually start sharing posts, you’ll need to connect your social media accounts so that Jetpack can post on your behalf.
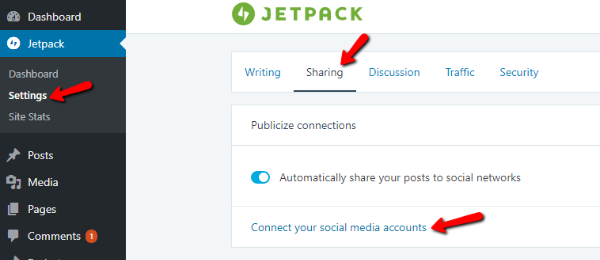
To do that, head to Jetpack → Settings and click on the Sharing tab. Then, under the Publicize connections module, click the link to Connect your social media accounts:
Jetpack will take you to your WordPress.com account where you can click the various buttons to Connect specific social networks:

When you click the Connect button, you’ll need to follow the prompts to authorize WordPress.com to post to your social media account. This is necessary for the feature to function.
Once you connect some social media accounts, you can also customize social sharing settings in the WordPress Editor whenever you publish a new post:

How to Speed Up Image Load Times With Photon
Making your WordPress site load faster is something you should always strive for. There are lots of things that you can do to speed up your WordPress site. But one of the biggest things is using something called a content delivery network, or CDN.
A CDN speeds up your site by loading your site’s files from as near as possible to your visitor’s computer.
I don’t want to get too technical here – just trust me that CDNs are good for performance!
Jetpack includes a built-in CDN for your images called Photon. When you enable Photon, your images will load from WordPress.com’s servers instead of your own. This both lessens the load on your servers and speeds up your site.
To enable Jetpack’s Photon CDN, you need to head to Jetpack → Settings and scroll down to the Media section. Make sure that Speed up images and photos is enabled:

That’s all you need to do! Jetpack will now automatically serve up your images from WordPress.com’s servers instead of your own.
How to View Your Site’s Traffic Stats
One especially nice thing about Jetpack is that it makes it easy for you to track and view basic traffic statistics about your sites. That is, you can see which pages on your site get the most visitors and where those visitors come from.
While these traffic stats aren’t nearly as detailed as Google Analytics, they’re plenty informational for casual blogging.
Traffic stats are turned on by default, so you shouldn’t need to enable anything to start collecting data.
To view your site’s stats, head to Jetpack → Site Stats. On that first page, you’ll see a general overview of your site:

You can also view stats for individual posts or pages by going to the Posts or Pages tabs in your WordPress dashboard and looking at the Stats column:

How to Manage Your Site With the Calypso Interface
Because Jetpack syncs your self-hosted WordPress site with your WordPress.com account, you can manage your self-hosted site from the Calypso interface.
Again, without going into the technical details of Calypso, let’s just say that it’s an attempt to streamline many of the important functions of your WordPress site. From it, you can write posts and pages in a different interface, as well as manage other parts of your site.
One great thing about Calypso is that you can also manage multiple different WordPress installations from the same interface.
To access Calypso, all you need to do is go to WordPress.com like normal. From there, you can write posts, view stats, quickly switch between sites, and lots more:

You by no means have to use Calypso – it’s just a neat option you get with Jetpack. If you prefer the familiar WordPress interface, you’re 100% fine to completely ignore Calypso.
Wrapping Things Up
Jetpack is a great plugin for self-hosted WordPress users because it adds so many features in one fell swoop. While you can find separate plugins to add 99% of the features included with Jetpack, it’s definitely a lot more work.
For that reason, Jetpack is especially helpful for casual WordPress users who don’t want to deal with using ten different plugins to handle the features added by Jetpack.
Remember, to enable Jetpack, all you need to do is follow these basic steps:
- Install and activate the Jetpack plugin
- Connect to your WordPress.com account
- Enable/disable modules as needed
And that wraps up our guide to Jetpack. Let us know if you have any questions!
]]>Best of all – the method I’ll outline in this post works whether you’re just moving your site to new hosting or migrating your WordPress site to an entirely new domain name. Either way – it’s the same process!
All you’ll need is:
- A free plugin called Duplicator
- Access to cPanel or another way to create a blank database
The plugin will handle everything else for you. And I’ll handle giving you detailed instructions for every single step.
Let’s get started! But first…
Do You Actually Need to Move WordPress By Yourself?
If you’re thinking that you’ll need to migrate WordPress just because you’re switching hosts…you might not actually need to lift a finger.
See, nowadays most quality WordPress hosts offer free site migrations. That means they’ll migrate your WordPress site over for free as a thank you for signing up for their hosting. If your chosen host doesn’t offer free migrations, you might want to give our hosting list a look over and pick a host that’s a bit more friendly.
All that to say – before you start running off to do this manually, make sure that you’re not missing out on a free WordPress migration service from your host!
Once you’ve ruled that out, here’s the detailed guide for how to migrate WordPress to either a new host or new domain name (or both at the same time!).
How to Migrate WordPress to New Hosting or Domain
While you can manually move WordPress by copying all of your site’s files and exporting your database via PHPMyAdmin…that’s a massive pain. And, in most cases it’s completely unnecessary.
See, as is often the case with WordPress, helpful developers have created a reliable (and free) plugin which handles the entire migration process in a much more user friendly manner.
Because the end result is the same, I’m going to eschew the 100% manual method in favor of showing you how to migrate WordPress using the free Duplicator plugin.
This plugin is popular, well-supported, and listed at WordPress.org. For the vast majority of sites, the free version of Duplicator is all that’s needed to migrate WordPress. Some WordPress sites that are especially large might need the premium version that offers better support for large migrations – but I’ve never personally experienced a site that couldn’t be migrated with the free version.
In a nutshell, here’s everything you’ll need to do to migrate your WordPress site with the Duplicator plugin:
- Create a backup “package” of your site
- Upload the package to your new host or server
- Run the Duplicator installer file
- (Optional) Update your site to a new domain name by having Duplicator change all references to your old URL to your new domain
Step 1: Install Duplicator on the Site You Want to Migrate
To get started, go to the WordPress dashboard of the site that you want to migrate and install the free version of the Duplicator plugin:

Make sure to activate the plugin after you install it.
Step 2: Create a New Package
In Duplicator’s terminology, a “package” is basically a self-contained version of your site. It contains two files:
- A .ZIP file of all of your site’s data, including both your files and your database.
- An installer file that allows you to easily turn this .ZIP file into a working copy of your WordPress site.
To create your first package, head to Duplicator → Packages → Create New:

On the next screen (Package Setup), there’s nothing that you need to configure. Just click the Next button:

Duplicator will then run a scan of your site to detect any potential problems. In my example screenshot, you can see that it’s warning me about the total size of my site. Most of the time, the backup should work fine even with the warnings unless you’re on extremely budget shared hosting.
Just click the Build button at the bottom to continue:

Depending on the size of your site, the build process might take a few minutes to complete. Once it’s done, you should see links to two different files:

Make sure to download both files because you’ll need them to complete the migration. Again, here’s all each file contains:
- Archive – a backup of your site’s database and files.
- Installer – a PHP file that handles the process of installing your archive on your new server.
Step 3: Upload Archive and Installer Files to New Server
Next up – you need to upload the two files (that you just downloaded) to your site’s new location. To do that, you’ll need to either connect to that server via FTP or use cPanel’s File Manager. You can use a free FTP program like FileZilla to connect to your new host.
Note – if you’re having trouble connecting to your server via FTP, you should ask your host to help. They’ll know exactly how to help you get connected.
Once you’re connected, upload the archive and installer.php files to the directory you want to migrate your site. Most of the time, that will be the root directory. It should look something like this when you’re done:

Step 4: Create a New Empty Database
One more step before you get to actually run the installer and check out your migrated site! Now, you just need to create a new database on the server you’re migrating your WordPress site to. This database will house an exact replica of your existing database.
But because Duplicator can’t create a database by itself, you’ll need to create a new database through cPanel and provide those details during the Duplicator install process.
To do that, head to your cPanel dashboard and find the MySQL Databases button:

Then, create a new database at the top:

Once you create your new database, you need to also create a new database user and give that user access to your new database.
To do that, you just need to scroll down to the Add a New User box and enter details for your new user:

Then, further down the page, you can Add a User to a Database:

Make sure to give the user All Privileges on the next screen. And then you’re good to go.

Step 5: Run the Duplicator Install Process
At this point, you’re ready to run the actual Duplicator install process. Just make sure to keep the database credentials you just created handy because you’ll need them during the process.
Assuming you installed WordPress in your root folder, you can get started by going to yourdomain.com/installer.php. For subfolders, just make sure to add the relevant subfolder before the “/installer.php” part.
If you’re just migrating your site to a new host with the same domain name, you should use your regular domain name. But if you’re migrating your site to a new domain name, you need to use your new domain name. Don’t worry – if you’re changing domain names, Duplicator will handle switching everything over.
When you access the URL, you should see a Duplicator interface:

Just check the Terms and Conditions box and click Next to get started.
On the next screen, you need to enter the database name, user, and password that you created in Step 4. Then click Next:
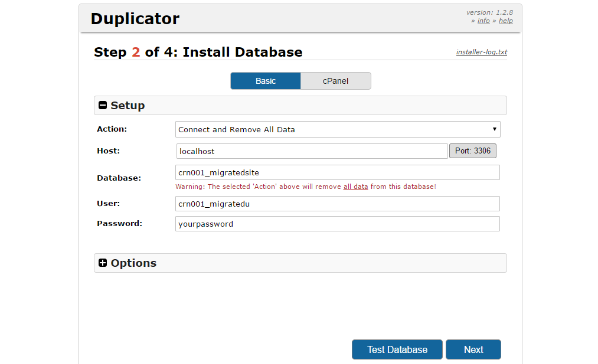
Confirm the information in the following prompt and then Duplicator will run the install.
If you’re switching domain names, Duplicator will automatically detect the change and update your database to ensure that everything still works properly. On the other hand, if you’re sticking with the same domain name, Duplicator won’t make any changes.

Basically – it’s 100% hands-off, which is one of the reasons Duplicator is such a great plugin.
Unless you want to create a new WordPress admin account, you can just go ahead and click Next without changing anything.
And that’s it! You just migrated your WordPress site the easy way.
You’ll definitely want to play around with the migrated version of your site to make sure everything is working properly just in case. But everything should function exactly the same as before the migration.
Additionally, it’s a good idea to re-save your permalink structure by going to Settings → Permalinks and just clicking the Save Changes button without making any changes. This ensures your .htaccess file is working properly.
Wrapping Things Up
While you can migrate your site manually by exporting and importing your database, as well as manually copying over all your files…there’s a reason that the Duplicator plugin has been downloaded over 6 million times.
Save yourself some time and frustration by following the instructions above and using the Duplicator plugin to migrate your WordPress site for free.
]]>If you are the sort of person who is comfortable with digging into your WordPress installation yourself then it’s quite possible for you to fix most problems yourself, of course if you at a beginner level of WordPress usage you might be better off contacting your web host for help fixing the issue. If you are using cheap shared hosting, then customer support might not cover issues with WordPress that might arise. If you are using Managed WordPress hosting though, which comes at a premium price, they should be more than happy to diagnose and fix any issues you might have.
In this post, we’ll cover seven of the most common WordPress errors so that you can get your WordPress site back to tip-top shape in no time.
What You’ll Need to Fix These Common WordPress Errors
I’ll try to make my solutions as simple as possible, but there are some times that you’ll need to dig into your site to fix the problem. Unfortunately, it’s simply unavoidable.
To that end, you’re going to need either:
- An FTP program – I like FileZilla
- Access to cPanel’s File Manager tool. You can find this from your cPanel dashboard
For some of the errors, you’ll need these tools to be able to access your site and edit or delete some files in case you can’t get into your WordPress dashboard the normal way.
If you’re not sure how to use them or where to find your login credentials, I recommend that you contact your host or peruse your host’s support documentation. The exact process and details depend on your host, so it’s unfortunately impossible for me to give instructions that cover every possibility.
Alright, let’s dig in and fix some WordPress errors!
1. WordPress White Screen of Death

If you’re a Windows user, you’re probably familiar with the blue screen of death. WordPress’ white screen of death is like that…but white. That is, you try to access your site and are met with an entirely white page.
Where the heck did your site go? And how do you get it back?
This can be a tough error to diagnose because it can be caused by both PHP and database errors. I’ll run through some common fixes below – but your last resort is to use the WP Debug feature.
How to Fix White Screen of Death
The first thing you’ll want to check is whether you have theme or plugin issues going on.
Deactivate all of your plugins
Go into your dashboard and deactivate all of your plugins. If you can’t access your backend dashboard, you can also connect to your site via FTP and rename the ...wp-content/plugins folder to something like plugins_old to accomplish the same thing.
Use the default theme
Go into your dashboard and change your active theme to Twenty Seventeen (the default). If you can’t access your backend dashboard, you can connect via FTP and rename the active theme’s folder to force WordPress to revert to the default theme.
Increase WordPress’ memory limit
If it’s not a theme or a plugin issue, you can try increasing the memory limit for your site. To do that, access your wp-config.php file and add this line:
define('WP_MEMORY_LIMIT', '64M');
You might also need to contact your host if they don’t allow you to manually change your PHP memory limit in this way.
Nothing working? Try the debug feature
If none of those fixed the issue, you can enable the WordPress debug tool by adding the following line of code to your wp-config.php file:
define( 'WP_DEBUG', true );
Debug mode will give you more information about what specifically is causing the error.
2. Error Establishing Database Connection

The Error Establishing a Database Connection error is simple to diagnose – it means exactly what it says!
For some reason, your WordPress site can’t connect to the database, which is where all of your content is stored. Without the database, WordPress can’t serve up any content, instead opting to display this error.
How to Fix Error Establishing Database Connection
We actually wrote a whole post on how to fix the WordPress Error Establishing Database Connection error. If you want detailed instructions, you should just head there. Otherwise, here’s a quick summary:
Check if you can still access the WordPress dashboard
If you can, you can use the WordPress repair tool to fix what is likely your corrupted database.
Check your database login details
Access your wp-config.php file and make sure that your database credentials (name, username, and password) match the credentials inside of cPanel.
Speak to your host
Your server might be running out of memory or your host might be experiencing issues that have taken databases offline. If the first two options didn’t work – talking to your host is your best chance at fixing the problem.
3. 500 Internal Server Error
Internal Server Error or 500 Internal Server Error are catchall error messages that indicate some problem with your server.
I’ll skip the “causes” section for this one because there are too many possibilities to list.
How to Fix Internal Server Error
Because there are a number of potential causes, you’ll have to take a broad diagnostic approach. Here are some recommendations, going from most likely to least likely.
Fix your corrupted .htaccess file
Connect to your site via FTP and rename your .htaccess file to something like .htaccess_old. If that fixed the problem, make sure to go to Settings → Permalinks and resave your permalinks to force WordPress to generate a new .htaccess file to replace the corrupted file that you renamed.
Deactivate all of your plugins
Connect to your WordPress site via FTP and deactivate all of your plugins by renaming …wp-content/plugins to plugins_old. If that fixed the problem, reactivate plugins one-by-one until you find the plugin that’s causing the issue.
Switch to the default theme
Access your …wp-content/themes folder via FTP and rename the folder for your active theme to force WordPress to use the default theme.
Increase your PHP memory limit
Edit your wp-config.php file via FTP and add the following line of code:
define( 'WP_MEMORY_LIMIT', '64M' );
You might also need to contact your host if they don’t allow you to increase the memory limit yourself.
Reupload wp-admin and wp-includes folders
Download a fresh copy of WordPress from WordPress.org and upload the wp-admin and wp-includes folders via FTP. Make sure to choose the option to overwrite existing files.
4. WordPress Parse or Syntax Error
The WordPress parse error message displays when your site is trying to run PHP code that has an error in it. This commonly happens when trying to add code to your functions.php file, though it can also result from an issue with your theme or plugin’s code.
How to Fix WordPress Parse or Syntax Error
First off – your server should show you the file with the issue as part of the error. For example – this error message tells me that the issue is in my functions.php file:

But it might also show you that it’s a plugin causing the issue.
The error also gives you a specific line number that contains the error.
Because this error almost always happens immediately after making a change – you should simply undo your most recent action.
That is, if you just added something to your functions.php file, connect via FTP and remove that line of code. Similarly, if you just activated a new plugin, connect via FTP and change the name of that plugin’s folder to deactivate the plugin.
5. Stuck in Maintenance Mode After Upgrade
Whenever you run an update on your WordPress site, WordPress automatically enables maintenance mode for the duration of the update so that your visitors don’t have a broken experience.
While most of the time this goes off without a hitch, sometimes things go wrong and WordPress gets permanently stuck in maintenance mode. No good!
How to Fix Stuck in Maintenance Mode After Upgrade
This one is easy to fix. All you need to do is connect to your site via FTP and delete the .maintenance file located in your site’s root directory.
Once the file is gone, your WordPress site should be back to normal.
6. Connection Timed Out
Sometimes you’ll go to access your WordPress site only to be smacked by a The Connection Has Timed Out error.
The most common cause for this error is a shared hosting environment with low memory limits. Essentially, your server is overworked and can’t respond to all requests, which cause the connection to, well, time out.
How to Fix Connection Timed Out
Even though the problem is caused by an overworked server, you can’t immediately know why your server is running under so much stress. Here are some tools to help find the problem.
Deactivate plugins and reactivate one-by-one
From either your WordPress dashboard or via FTP, deactivate all of your plugins. If that fixes the problem, reactivate your plugins one-by-one until you can find the plugin that’s causing the issue.
Increase your PHP memory limit
You can try adding this line to your wp-config.php file:
define( 'WP_MEMORY_LIMIT', '64M' );
But if that doesn’t work, you’ll need to contact your host directly about increasing your memory limit.
Upgrade your hosting
For super cheap shared hosts, sometimes your server just can’t cut it. In those scenarios, you may need to consider upgrading to better WordPress hosting.
7. 404 Page Error
If you’re trying to visit a page that you know should exist but are running into a 404 page error instead, you’re probably having issues with your permalink settings and/or .htaccess file.
How to Fix 404 Page Error
Assuming you can still access your WordPress dashboard, the easiest thing is to just navigate to Settings → Permalinks and save the page to reset your permalinks.

If you can’t access your WordPress dashboard, you can also connect via FTP, rename your existing .htaccess file to something else, and then complete the same process inside your now-working WordPress dashboard.
Wrapping Things Up
While these are not the only WordPress errors you’ll run into, they are some of the most common issues.
For all other issues, or when you’re just plain not sure what’s going on, a good strategy is to:
- Deactivate your plugins and reactivate them one-by-one
- Return to the default theme
- Increase your memory limit if possible
- Reset your permalinks and .htaccess file
- Upload a fresh copy of wp-admin and wp-includes folders
And if none of those things work, asking your host for help is never a bad option! Good managed WordPress hosts have WordPress experts on support duty, so they should be able to help you figure out the problem.
]]>